If you own an Insta360 camera and utilize Insta360 Studio for video editing and exporting, you may have encountered a frustrating issue with sound cutting in and out at regular intervals throughout your videos. This can significantly affect the viewing experience and the overall quality of your content. Thankfully this guide will provide you with a quick and effective solution to fix audio on and off in Insta360 exports.

Table of Contents
Related: How to convert 360 camera INSV format files to MP4.
In recent years, 360 cameras have gained immense popularity due to their ability to capture immersive footage without the need to worry about camera orientation. However, mastering the post-processing and editing of 360-degree footage, especially when it comes to handling sound, can present some challenges and requires time and practice to perfect.
To cater to the needs of Insta360 camera users, Insta360 offers a dedicated editing software called Insta360 Studio. This software serves as a versatile tool for keyframing and editing 360 content, providing a seamless workflow for enhancing your videos. While there is a plugin available for Premiere Pro integration, Insta360 Studio offers distinct advantages, including default proxy usage (low-resolution video samples), resulting in faster, smoother, and more reliable editing capabilities, particularly for users with less powerful machines.
In contrast, importing footage directly into Premiere Pro may necessitate manual proxy creation or result in sluggish and cumbersome playback on slower PCs. Then there’s the fact that Premiere Pro is rather expensive.
How to fix sound problems when exporting from Insta360 Studio. Insta360 sound cutting in and out fix.
Now, let's delve into the process of fixing sound problems that occur when exporting videos from Insta360 Studio. Particularly audio cutting in and out every few seconds.
- First, ensure that you have the latest version of Insta360 Studio installed on your computer. Launch the application and import the video file that you wish to export.
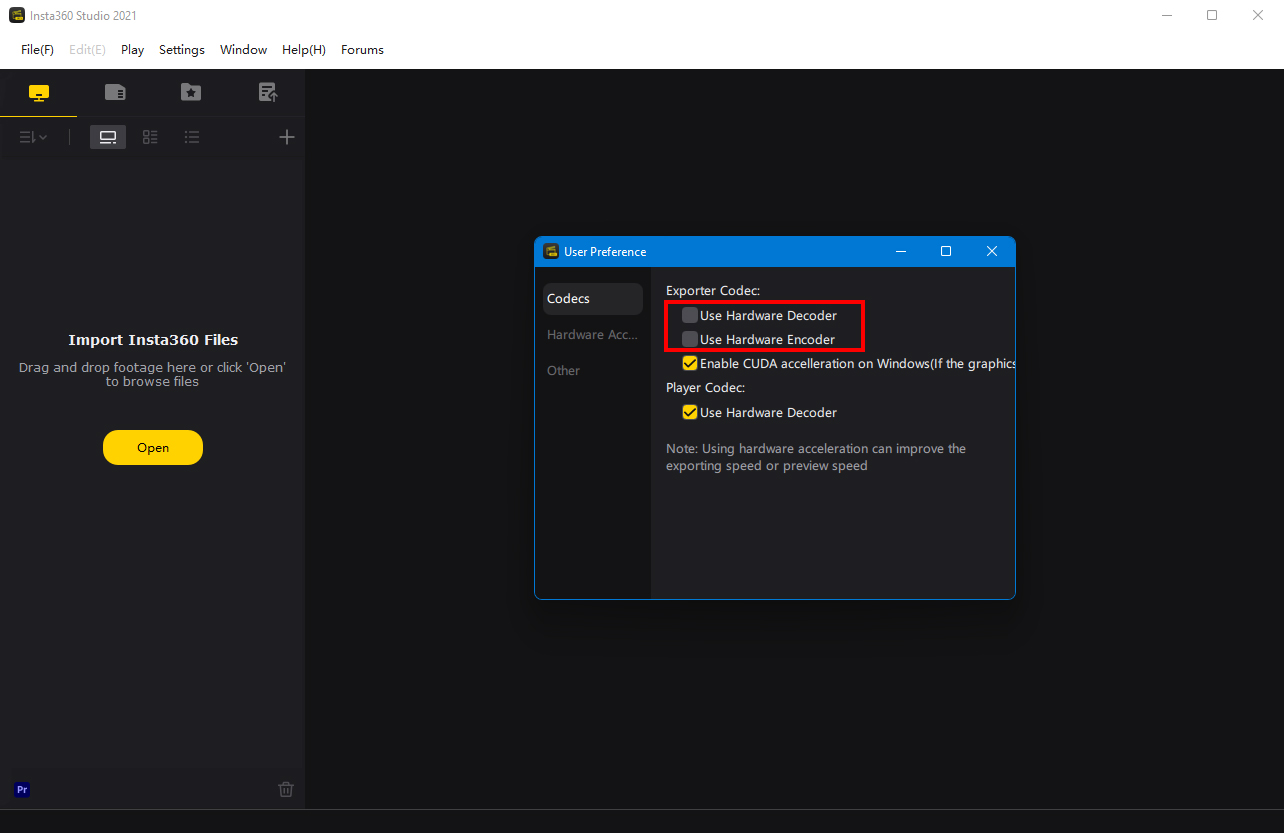
- Once you have completed the editing process and are ready to export your video, navigate to the top of the screen and click on "Settings" and then select "Preferences."
- In the newly opened window, you will find checkboxes labelled "Use hardware decoder" and "Use hardware encoder." Uncheck these boxes to disable the hardware decoder and encoder options.
- Close the preferences window and proceed with exporting your project as you normally would. It is important to note that the export process may take slightly longer than usual, but the result will be a video with stable and uninterrupted sound.
Although I personally have not encountered sound cutting in and out all that often it does happen from time to time and can also be device-specific. I have found that disabling the hardware encoder and decoder options resolves the issue consistently. You can also use this to fix issues with video flickering and stuttering.
How to fix flickering at the bottom of video exported from Insta360 Studio.