If you are trying to edit videos in Davinci Resolve but are having major problems with choppy and laggy playback this article will show you several different things you can do to fix the problem and get Davinci Resolve playback content without super annoying choppy performance. As is typical you will have to make a couple of changes to the way you work but they will fix the lagging issue and stop Davinci Resolve Playback lag.

Table of Contents
Related: How to Fix MP4 Format Files Not Accepted in Davinci Resolve. Davinci Resolve Can't Import MP4 Files.
Davinci Resolve is unbeatable value for money because it is entirely free and gives you access to the best video editing software on the market. There's also a paid version that's even better but isn't required to get a great editing experience. While Davinci is 10x better than Premiere Pro and all the other alternatives on the market it relies quite heavily on graphics hardware rather than CPU hardware which can cause some playback and performance issues for lower-end machines. That said there are ways to deal with the problem especially when the default cache and timeline settings aren't working for your system specs. This is where Proxies come into play and allow you to work with 4k content without the massive resource hit.
If you're not entirely new to video editing you will have heard of proxies but may not be using them so before we go through the solution to get smooth playback in Davinci we'll explain a little about proxies and why they are key to smooth playback. In video editing, proxies are lower-resolution or compressed versions of your original video files. Editors use proxies as stand-ins during the editing process to improve performance and streamline the workflow. Here's how proxies help in video editing. Before you jump in make sure you have the latest Davinci Resolve version if not update it.
Why you need to Use Proxies in Davinci Resolve on Laptops and low-end devices.
-
Improved Performance
- Original high-resolution video files are resource-intensive and will cause playback lag or stuttering during editing and playback. Even with a big render cache configured.
- As proxies are lower in resolution and require less processing power, allowing for smoother playback and real-time editing, even on less powerful hardware which is commonly found in laptops.
-
Faster Editing
- Proxies make the editing process more responsive, as they are easier to manipulate and require less time for rendering changes.
- Editors can make quick adjustments without waiting for the system to process the full-resolution footage.
-
Faster Exporting
- When the editing is complete, the system can use the original high-resolution files for final rendering.
- This ensures that the exported video maintains the best possible quality.
How to Fix Laggy Playback in Davinci Resolve Using Proxies.
- To optimise proxy use in Davinci Resolve adjust the following settings.
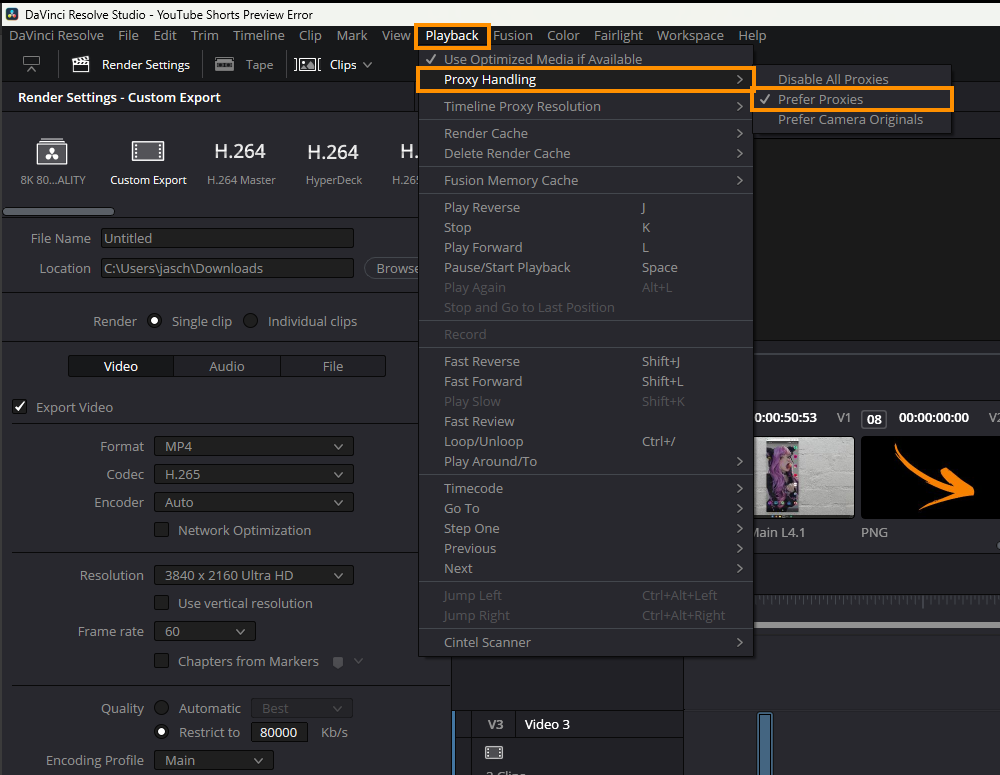
- Open a project then click on Playback > Proxy handling and set it to Prefer Proxies.
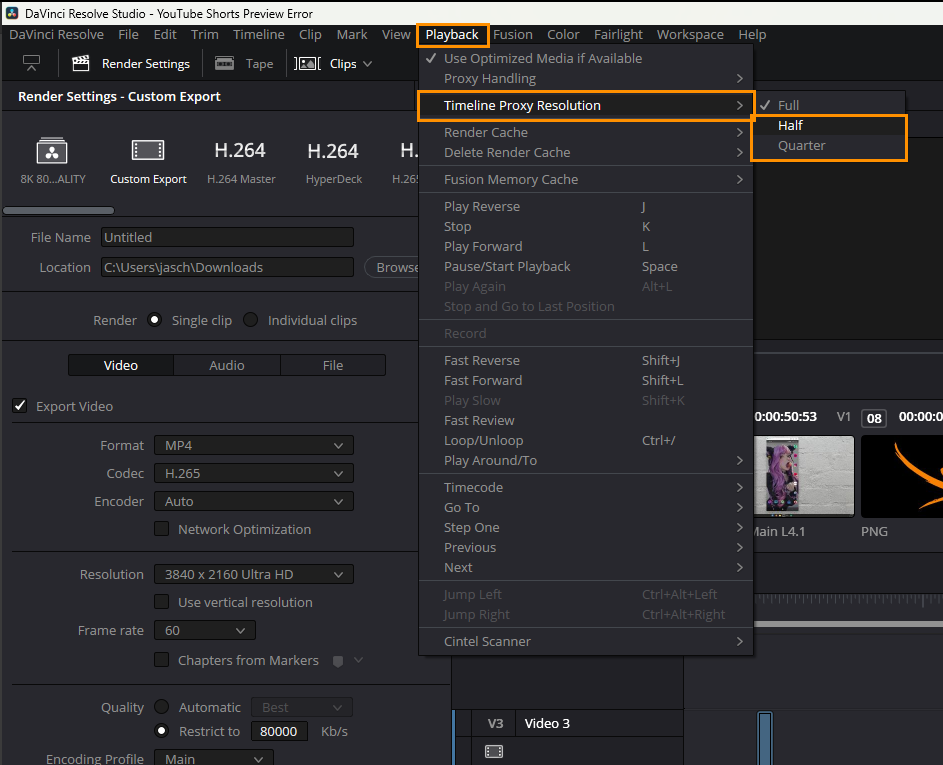
- Next, go to Timeline Proxy Resolution and set it to Half or Quarter. This will drop the playback resolution down to a level that stops choppy playback and enhances playback performance. Don't forget there are also a few other things you need to do as well so continue reading.
Changing these two settings alone is usually enough to solve this problem. However, there are a couple of other changes you should also make that will make playback smoother and stop stuttering playback.
Change the Timeline Playback resolution in Davinci Resolve.
To change the playback resolution of the Timeline in Davinci Resolve do the following.
- First open Davinci Resolve, and a project.
- Once you have a project open go to File > Project Settings.
- In the new window that appears use the drop-down box next to Timeline resolution and choose 1920x1080 for horizontal footage or 1080x1920 for landscape footage. You can use even lower resolution if you want to but 1080p should work fine for most modern devices.
- Alternatively, you can also use completely custom timeline resolutions if your project is a completely random resolution.
- After you have made the change click Save at the bottom of the screen to confirm the changes. If you don’t do this and close the window the timeline will revert back to the project's default video resolution.
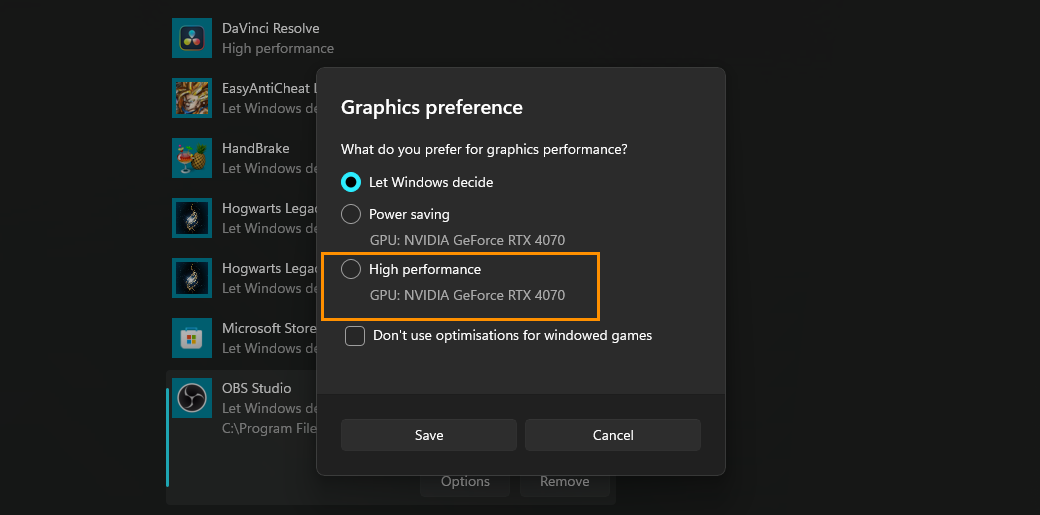
Change Windows Graphics Performance Settings.
- Open Windows Settings by pressing Windows Key + I.
- Next, go to Display > Graphics.
- On this page click the Add Desktop App button and select the Resolve.exe file inside the Davinci Resolve installation folder.
- Once you have done this use the drop-down arrow next to Davinci Resolve to expand more options.
- Here change the GPU preference option from Let Windows Decide to High Performance.