If you are trying to empty the Recycling Bin on Windows 10 but keep getting the following error message: File does not have a program associated with it for performing this action. This article will show you several different things you can do to solve the problem and empty everything out of the recycle bin.

Table of Contents
Related: How to fix a keyboard opening shortcuts not typing on Windows 10.
Windows 10 has a lot of strange errors that come and go, with some that even affect places like the Recycle Bin. One of the most efficient parts of the entire operating system. It’s quite possible to use Windows for years without ever encountering an issue with the Recycle Bin. Recently, however, there are reports of an unusual error preventing files from being removed from the recycling bin: "File does not have a program associated with it for performing this action – Recycle bin”
As always there are quite a few solutions available for Windows 10 that you can use to solve this problem, though they aren’t probably ones that you’ve used in the past. The good news is that they are relatively easy to action so you won’t be stuck for hours trying to resolve this issue. Below you will find all the possible fixes. I suggest working through them in chronological order.
Repair a Corrupted Recycling Bin on Windows 10.
The first thing you need to check if you are having this error message when emptying your recycling bin is corruption. If you haven’t done this before, check out the following guide Recycle Bin Corrupted on Windows 10 Fix.
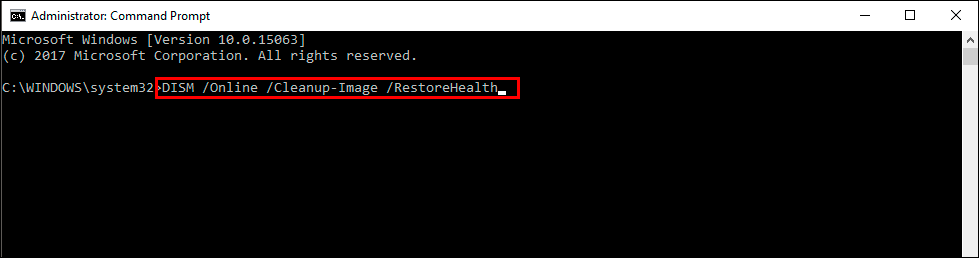
Run the DISM on Windows 10.
- Open Command Prompt (as administrator).
- Type DISM /Online /Cleanup-Image /RestoreHealth into the window and press Enter.
- Wait for it to run as it takes some time.
- Once it’s finished, Restart your computer.
Run ‘chkdsk’ on Windows 10.
One of the easiest tools you can use to fix this issue is the Windows 10 chkdsk tool which will hopefully check and fix any errors on your device. To run the tool open Command Prompt as Admin, then copy and paste the following command into the window. Obviously replacing (Drive Letter) with the drive letter of your device. Then press Enter.
chkdsk (Drive Letter): /f /r /x /b
It should look something like this.
chkdsk D: /f /r /x /b
The command will either start running straight away or display the following message:
“Chkdsk cannot run because the volume is in use by another process, Would you like the schedule this volume to be checked the next time the system restarts? (Y/N)”
If you get this message press Y on your keyboard to confirm the check after a restart. Now Restart your computer and wait for the results. If your drive is working fine after the check, you can wrap this guide up here, if it isn’t, continue reading.
Run the SFC Command.
Before starting these steps, make sure you have a backup of your data, just in case something goes wrong. The chances are low but it’s always best to be safe than sorry. This is standard procedure for any repair task on Windows 10 anyway.
To begin, press the Windows Key + X to open Command Prompt (as administrator)
In the Command Prompt window type sfc /scannow, then press Enter. Now, wait for the process to finish. (which may take quite a few minutes)
If your computer is in full working order, without any corrupt or missing operating system files, the scan will show the message: Windows Resource Protection did not find any integrity violations.
Note: If sfc doesn’t find any errors proceed to the next solution, skipping the 3 dot points below.
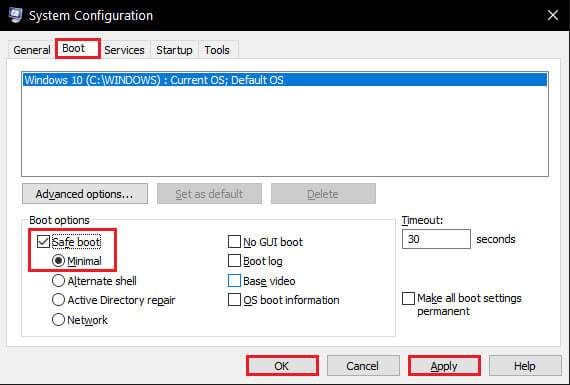
Delete files in Safe Mode.
To boot Windows 10 in Safe mode:
- Open Run tool by pressing Windows Key + R.
- Type msconfig into the text box and press Enter.
- Under the Boot tab, tick Safe Boot and make sure Minimal is selected.
- Click Applyand Restart the computer.
When your computer boots into safe mode, try to delete the files. If the still don’t delete after everything so far, you’ll need to move on to the final solution.
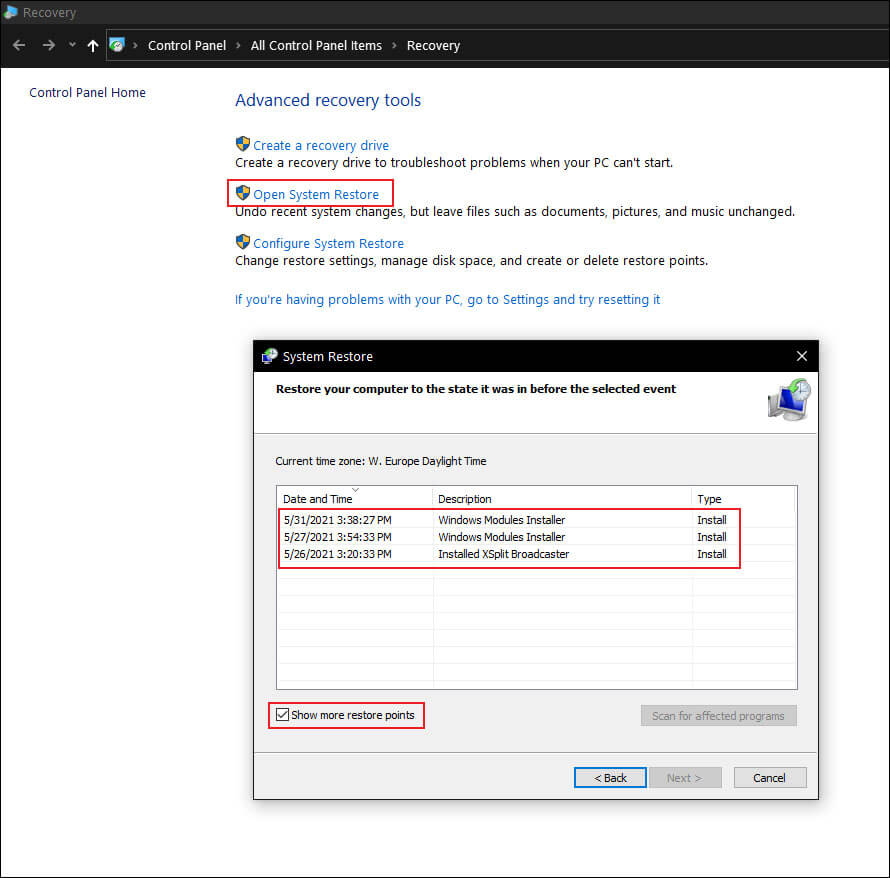
Perform a System Restore to go back in time.
To restore your computer using system restore do the following:
- Type Recovery into the Start Menu.
- Click Recovery > Open System Restore.
- Click Next to view the list of system restore points available.
- Select one which you think worked fine, and restore it.
Just make sure you pick one that I think was before the issue occurred. I generally like to go back a week or so just to be sure, but it really depends on what restore point options you have available.