If you are having problems with SETUPAPI.dll Missing or Not Found Error in Windows 11. This article will show you several different fixes you can use to solve the problem and get your computer and software working properly again. Simply work your way through the solution until you solve the problem.

Related: How to fix CFGMGR32.dll Missing or Not Found Error on Windows 11.
Dynamic Link Libraries (DLLs) are essential components in the Windows operating system, providing a collection of instructions that multiple programs can access concurrently. These libraries improve software efficiency by storing code and data that multiple applications can use simultaneously. DLLs play a critical role in managing resources, ensuring optimal utilization of computer memory.
Typically, though, there are plenty of situations where errors related to DLL files occur, causing disruptions in the functioning of various applications. While these issues are usually caused by minor corruptions and Windows updates there are other random issues that may cause them to occur. A classic example is "SETUPAPI.dll missing or not found" error that Windows users may encounter when trying to open specific programs.
SETUPAPI.dll is a crucial system file used in Windows, forming part of the Windows Setup API. Its main function is to manage the installation and configuration of the operating system and applications, facilitating the setup of various software components on a Windows computer. Thankfully there are ways to restore this .dll file and prevent the error from occurring so follow along as we guide you through the process.
Note: It's essential to create a backup of important data before attempting any significant system changes.
Run the Windows Store Apps Troubleshooter
- Type "Troubleshoot" in the Windows search bar and press Enter.
- Click on "Additional troubleshooters/Other troubleshooters."
- Scroll down to find "Windows Store Apps" and select it.
- Click "Run the troubleshooter/Run."
- Wait for the process to finish and apply the fixes.
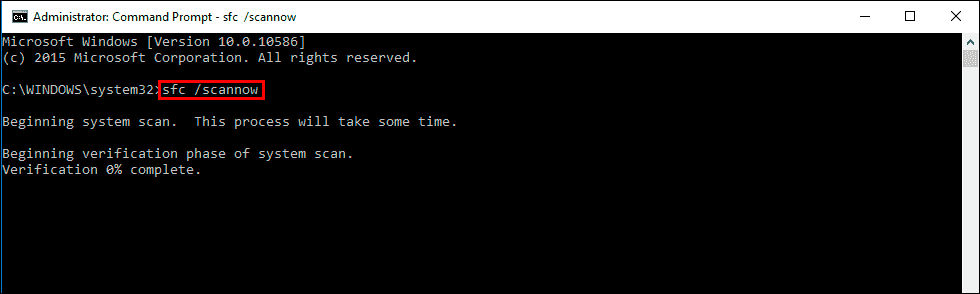
Run SFC and DISM Scans
- Type "cmd" in the Windows search bar.
- Right-click on "Command Prompt" and select "Run as administrator."
- When prompted by UAC, click "Yes."
- Type the following command and press Enter: sfc /scannow
- After the SFC scan completes, run the following commands as well:
dism /online /cleanup-image /scanhealth
dism /online /cleanup-image /checkhealth
dism /online /cleanup-image /restorehealth
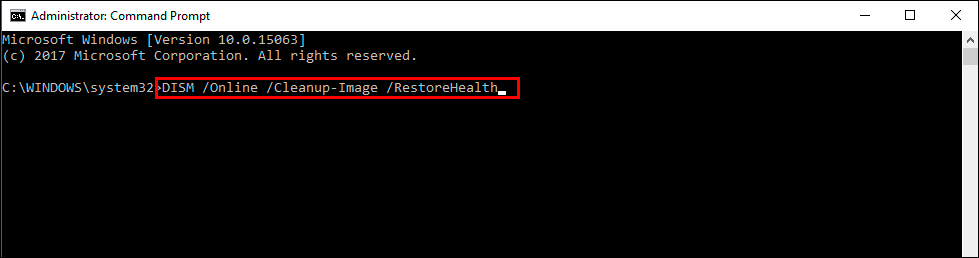
- If you encounter an error executing the last command, add /Source:C:\RepairSource\Windows /LimitAccess to it and try again.
- Restart your device after the scans are finished.
Run the Check Disk Tool
- Open Command Prompt as administrator, as explained earlier.
- Type the following command and press Enter: chkdsk c: /f
- For SSD as your primary partition, use: chkdsk c: /f /r /x
- If prompted, type "Y," close Command Prompt, and restart your system.
- Wait for the scan to finish, and check the results in the Event Viewer.
Reinstall the Problematic App
- Right-click on the Start menu and select "Apps and Features."
- Scroll down to find the app triggering the error.
- Select it and click "Uninstall" – follow the prompts to complete the process.
- After uninstalling, reboot your system and reinstall the app.
Perform System Restore
- Type "Create a Restore point" in the Windows search bar and press Enter.
- Go to the "System Protection" tab and choose "System Restore."
- Click "Next" and select "Show more restore points" (if available).
- Pick a time before the problem occurred and click "Next."
- Follow the prompts to finish the process.
Repair-Install Windows
- Create a Windows ISO by downloading Windows 11 from the official website.
- Run the MediaCreationTool.exe file and follow the instructions to create the ISO.
- Go to the location of the ISO file, right-click, and select "Mount."
- Run the setup.exe file and choose "Not right now" when asked to update Windows.
- Accept the terms and let Windows perform necessary checks.
- Click "Change what to keep" and select the option that suits you best (keeping files and apps, files only, or keeping nothing).
- Click "Next" and then "Install" to start the repair installation process.