If you have updated to Windows 11 and have recently started getting error 0x800f0989 when you try to install the latest update/s. This article will guide you through several different troubleshooting steps you can use to resolve the issue that is preventing Windows 11 from updating to the latest version.

Table of Contents
Related: How to fix can only use Microsoft Edge on Windows.
As much as we’d all like to think and hope that Windows 11 would be a major improvement over Windows 10. Things seem to be taking a very traditional path, with a range of different Windows update errors already present in the operating system. Although this isn’t exactly surprising it is a little disheartening as we’ve all been hoping for some major stability improvements.
Thankfully, just like on Windows 10, there is a range of steps you can take to solve this issue and get rid of error 0x800f0989 on Windows 11. A lot of these solutions are probably ones you’ve used in the past on Windows 10 so they probably won’t as too much of a surprise. Either way, work your way through the solutions shown below until error 0x800f0989 is gone.
Fixing error 0x800f0989 on Windows 11: Run Windows Update troubleshooter
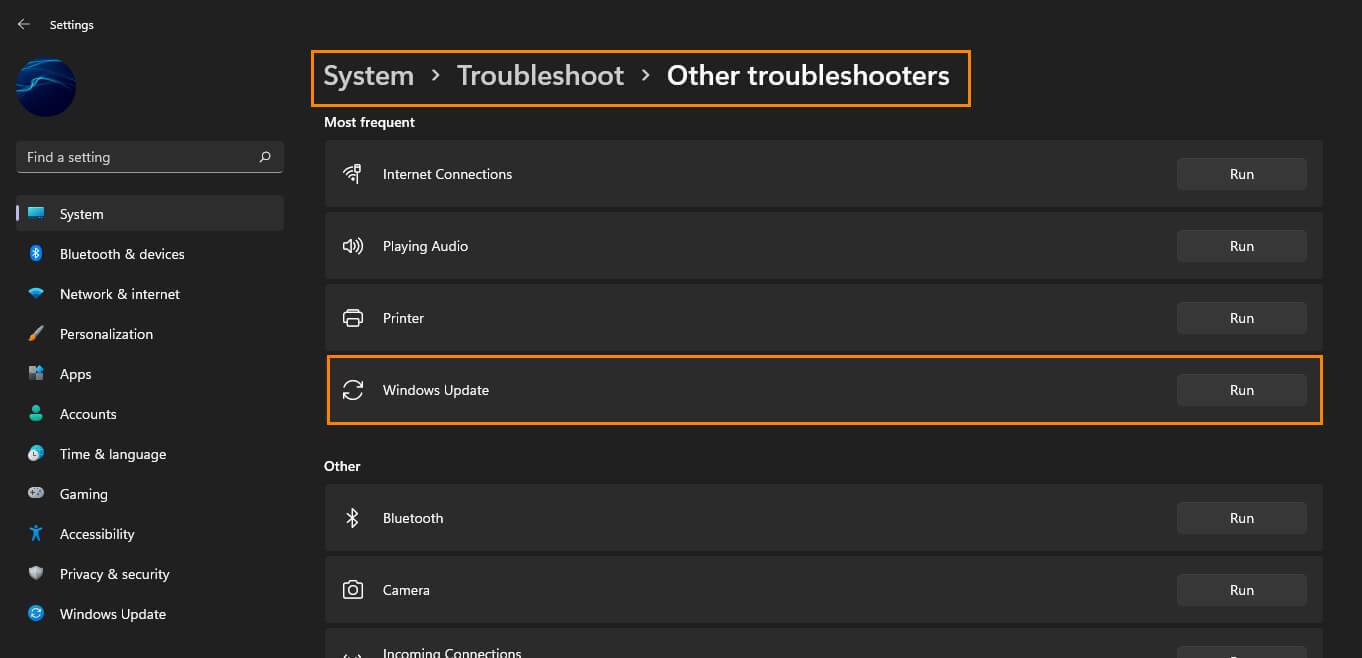
To begin, the quickest and easiest way to solve error 0x800f0989 is by running the Windows 11 Update Troubleshooter. This tool will check and fix any issues that it finds are preventing Windows 11 from updating. To use the Windows Update Troubleshooter, you’ll need to do the following.
- Open Settings, then go to System > Troubleshooting > Other troubleshooters > Windows Update.
- On this page, click the Run next to Windows update option and wait for the Update troubleshooting tool to check for any problems. If it encounters any it will fix them automatically.
- After it completes, Restart your computer and check to see if Windows 11 will update. If it doesn’t continue with the steps shown below.
Fixing error 0x800f0989 on Windows 11: Check Services status.
The next thing to check is Windows 11 update service. These should run automatically by default but do occasionally get disabled. To make sure they are running you’ll need to do the following.
- Search Services from the start menu then click it when it appears.
- Next, find and double-click on the Background Intelligent Transfer Service.
- If it is already running, click Stop. Then click Start to get it running again. Finally, click ok to save the change.
- Now do the same with Windows Update and Workstation services.
After that, Restart your computer and check if the problem is resolved or not.
Fixing error 0x800f0989 on Windows 11: Reset Windows Update components.
If nothing so far has worked, you can try resetting Windows update components. This will give Windows 11 a clean slate to work from and remove any corruptions that may be causing Windows to get confused during the update process. You’ll find all of the instructions for resetting Windows Update Components here.
Fixing error 0x800f0989 on Windows 11: Download from Microsoft Update Catalog.
If nothing so far has worked, your best bet is to update Windows 11 manually. To do this visit the Microsoft Update Catalog page and search for the Windows version you require. Use the KB number next to the update shown on the Windows update page. It usually looks something like (KB234234). When you find the update file on the Catalog page, download the correct version for your computer.
