Table of Contents
If you are using Google Chrome from a Windows 10 device and want to prevent users from adding and/or installing extensions. This article will show you several different ways you can disable extension installation on Chrome from Windows 10. Blacklist extensions, whitelist extensions or simply block them all on Google Chrome.

How to Fix ‘Waiting for Cache’ on Google Chrome. (Chrome Stuck Waiting For Cache)
In the past, we have covered how to disable extension installation on Mozilla Firefox to prevent users from installing potentially harmful software on your computer. Just like on Firefox extensions can also be blocked from installation on Google Chrome, using a very similar process.
Seeing as there are dozens of reasons you may wish to block and manage the installation of extensions on your browser we won’t go into those details and instead get straight into the guide. So without further adieu let’s show you how to prevent or manage extension installation in Google Chrome.
Related: How to Bypass Dot Compliance Blocks That Restrict Website Access.
Option 1: How to Disable Chrome Extension Installation on Windows 10 Using Write Permissions.
This is the easiest of the three options listed in this article and only works for the particular Chrome profile you restrict write permissions to. Users will be able to add extensions to other Chrome profiles “should” they figure it creating a new profile will lift the ban. This method will only block the installation of new extensions, so extensions that are already installed will continue to work.
Step 1: Open the Default Chrome browser folder. Which can be found in the following location:
C:\Users\(username)\AppData\Local\Google\Chrome\User Data\Default
Note: Default might not exist in your User Data folder. You may see Profile 1 or something similar instead.
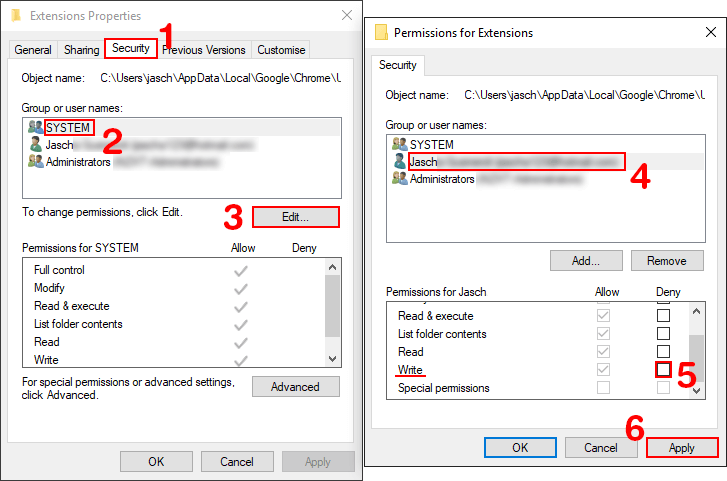
Step 2: Within the Default folder, right-click the Extensions folder and select Properties
Step 3: From the Properties window change to the Security tab and select the System, then click Edit.
Step 4: In the next window that appears select the username, then make sure the Deny option for Write Permission is checked. Once done, save the changes by clicking Apply.
Now whenever that particular Chrome user tries to install a Google Chrome extension, it will display an error message: “could not move extension directory into profile“. If you ever wish to restore extension support for that user just return to the same location and undo the change.
Option 2: How to Disable Installed Chrome Extensions and Block the Installation of New Chrome Extension on Windows 10 Using Local Group Policy. (Blacklist All Chrome Extensions)
This option won’t work for you by default so you will have to make sure you have added Group Policy support to Chrome beforehand. You can find our guide on doing so here. Once you have Chrome support in Group Policy continue with the steps below.
Step 1: Open Group Policy by searching gpedit.msc from the start menu or by entering it into the run tool.
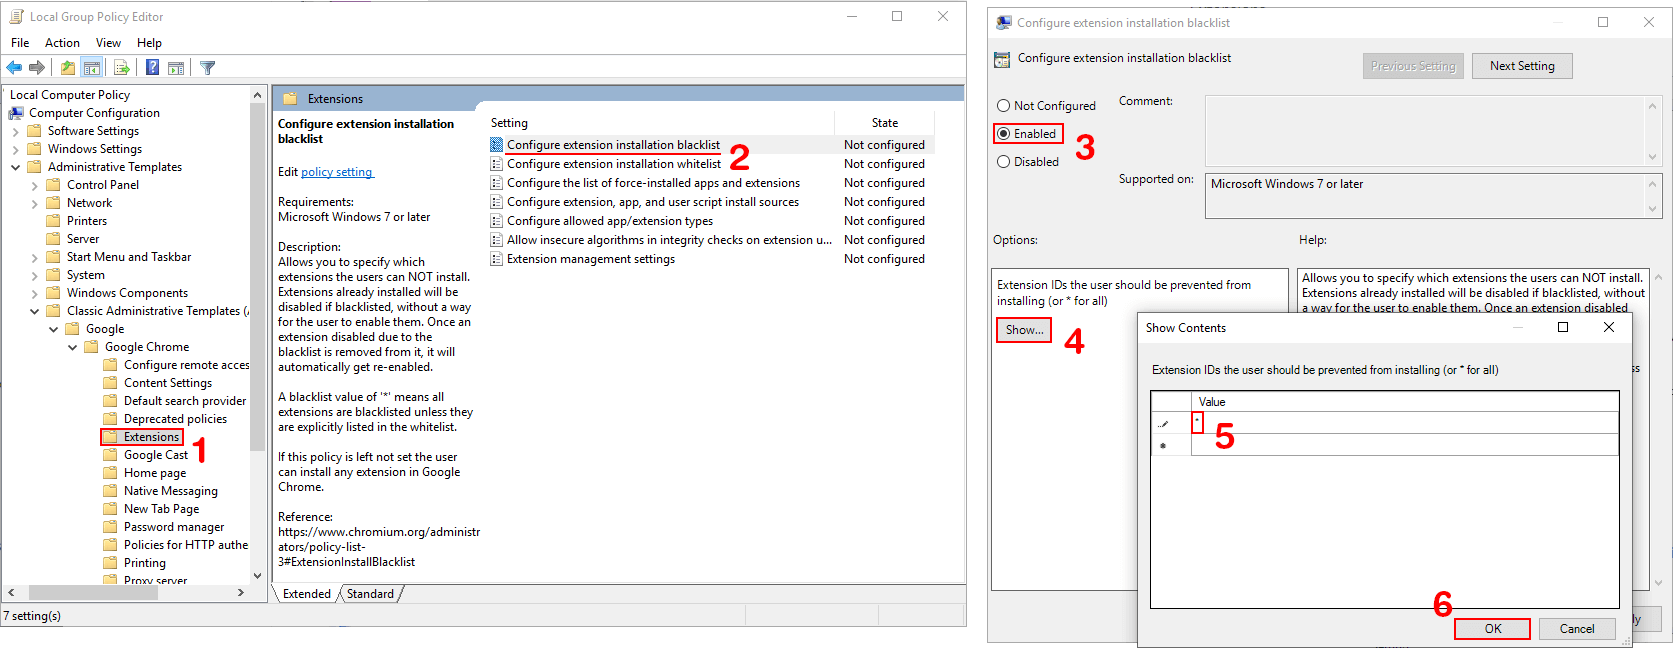
Step 2: When you have the Group Policy window open, navigate to the following path using the left-hand pane: Computer Configuration > Administrative Templates > Classic Administrative Templates (ADM) > Google > Google Chrome > Extensions
Step 3: In the right-hand pane double-click configure extension installation blacklist and another new window will appear.
Step 4: Here, select Enabled, then click Show. A small window will pop up, double click the Value field, add *, then click Ok.
As soon as you make the change it immediately disables all Chrome extensions. If you have Chrome open you will see it display an error message. From now on if you try to access the extension page or try to enable an extension, it won’t open or enable. If you try to add a new extension it will display an error message. If you wish to undo the change. simply return to the same location shown in Step 4 and set it Not Configured.
Option 3: Block the Installation of Chrome Extensions on Windows 10 But Allow Only Specific Extensions to Work. (Whitelist Specific Chrome Extensions)
This option follows a very similar path as the above method but will instead allow you to install or use specific extensions. Any others not whitelisted will be disabled and new extensions that aren’t whitelisted will be blocked from downloading.
Step 1: Follow everything in Option 2. This will disable all existing extensions and block the installation of new extensions.
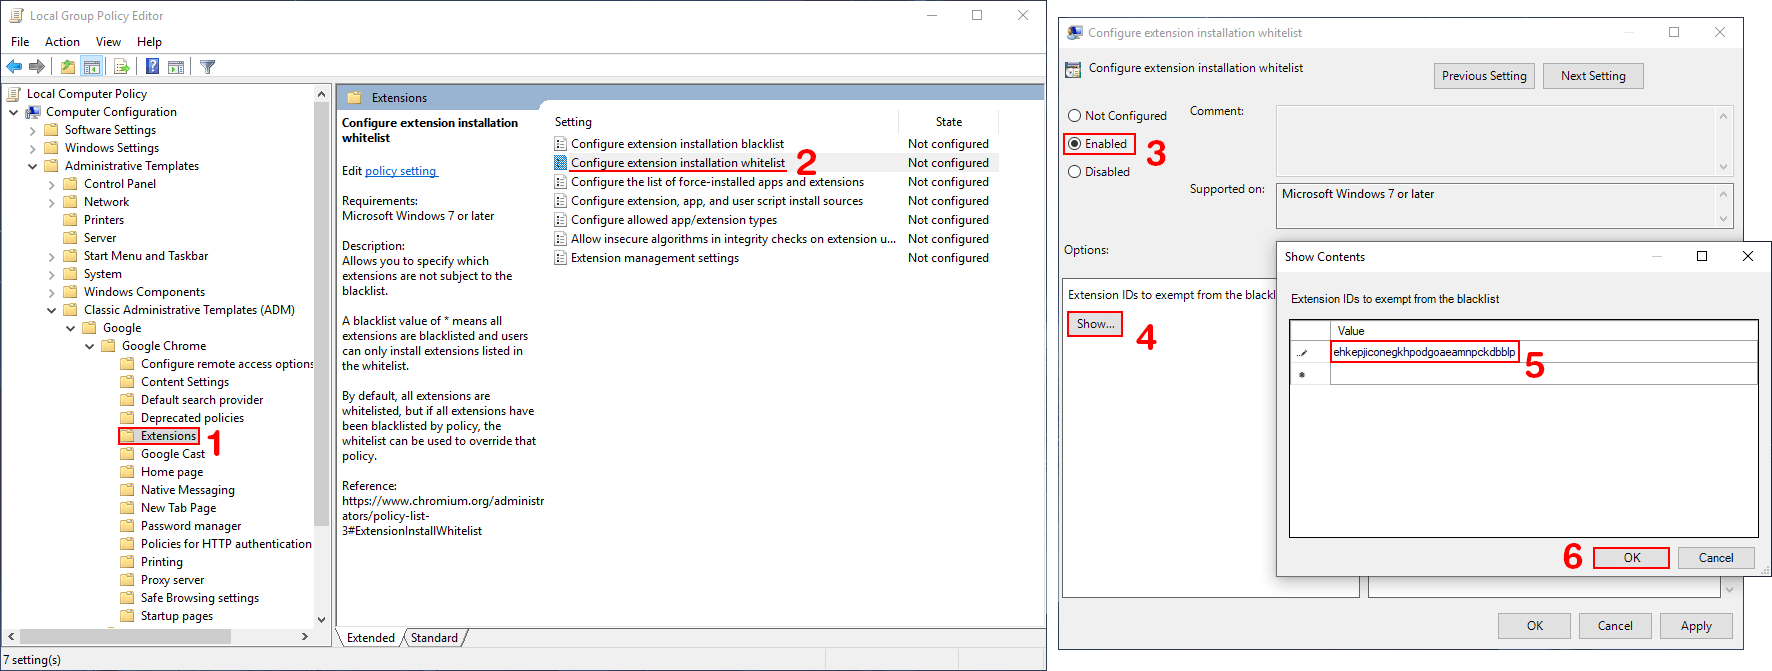
Step 2: From the main Group Policy window, navigate to the following path using the left-hand pane: Computer Configuration > Administrative Templates > Classic Administrative Templates (ADM) > Google > Google Chrome > Extensions
Step 3: On the right-hand pane double-click Configure extension installation whitelist.
Step 4: In this new window click Enabled, then Show. A new window will open where you can enter an extension id in the Value field. To find an extensions id go to its URL on the extension homepage and copy the text at the very end.
Note: You can also use the ID system shown here to blacklist specific extensions using the steps shown in option 2. Simply use the ID code rather than the * which is the block all code.
Below is an example of the extension ID.

That’s it, the changes will take place instantly and any extensions you haven’t whitelisted will be disabled and blocked from future downloading. Again if you wish to disable the feature simply return to the same location and flip the toggle from Enabled to Not Configured.
.
.