If you are just setting up a new system with a Gigabyte motherboard and would rather adjust and customise all your fan speed settings from Windows rather than the BIOS. This article will show you how to set up and use Smart Fan 5 on Windows 10 and 11 so that you can view and adjust your CPU and system Fan speeds, curve and ramp-up times easily.
Table of Contents
If you have just finished setting up a brand new desktop build with a Gigabyte motherboard and tried to install Windows 11, you probably encountered a major issue when disabling CSM support that prevents the BIOS from loading. As a result, you’re probably trying to avoid using the BIOS as much as possible moving forward which has probably pushed you to the idea of using Smart Fan 5.
Smart Fan 5 is a great piece of software from Gigabyte that works extremely well and allows you to customise your system and CPU fan speeds, including fan curve settings, ramp-up times and more. While it is easy enough to set up and start using there are some ways you can optimise your fan curves for modern CPUs which run hotter than previous generations.
How to set up Gigabyte App Center and System information viewer (SIV). (Windows 10 & 11)
To begin, the first thing you are going to need to do is to find out the exact model of your motherboard. If you don’t already know this from the top of your head you can do the following.
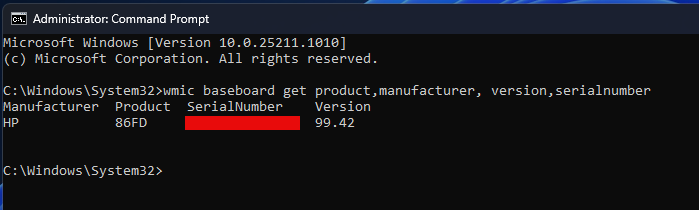
- First, open Command Prompt as Admin by searching CMD from the Start menu and selecting Run as administrator. when it appears run the following command and it will show you the exact specs of your motherboard.
wmic baseboard get product,manufacturer, version,serialnumber
- Now you can go to the Gigabyte website and download the version of the software for your system. So download App Center, and System information viewer (SIV).
- Install App Center first, followed by System information viewer. Then restart your computer.
Now we can start adjusting fan settings on Windows 10 & 11 from Windows, not the BIOS.
- Now that your computer has restarted, click the new App Center icon in the Taskbar, then click SIV when it appears.
- The first time you open SIV it will ask you to run the auto-configuration tool. Let this finish, then you can start making some changes.
- When you are finally on the SIV home screen change to the Smart Fan 5 Advanced tab and you will see the fan curve graph. Now, this is where the fun begins.
- If you know where your CPU max temp is and already have a rough idea of the fan curve you want to use you can start dragging the dots on the graph around to adjust your fan temp/speed settings.
- If you have no idea what temperature your CPU maxes out at under load or what temperature it idles at, you’ll want to find out that information before planning out a fan curve.
- To do this, Download FurMark, then open it and click CPU burner on the main screen. This will stress test your CPU to see where it will max out, with SIV open you will be able to see the red dot move around.
- Now that you know exactly where your CPU will max out, you can adjust your fan settings accordingly. The first thing to do is move the top dot to the maximum temperature your CPU reaches. So if it hits 90c set 90c as 100% fan speed.
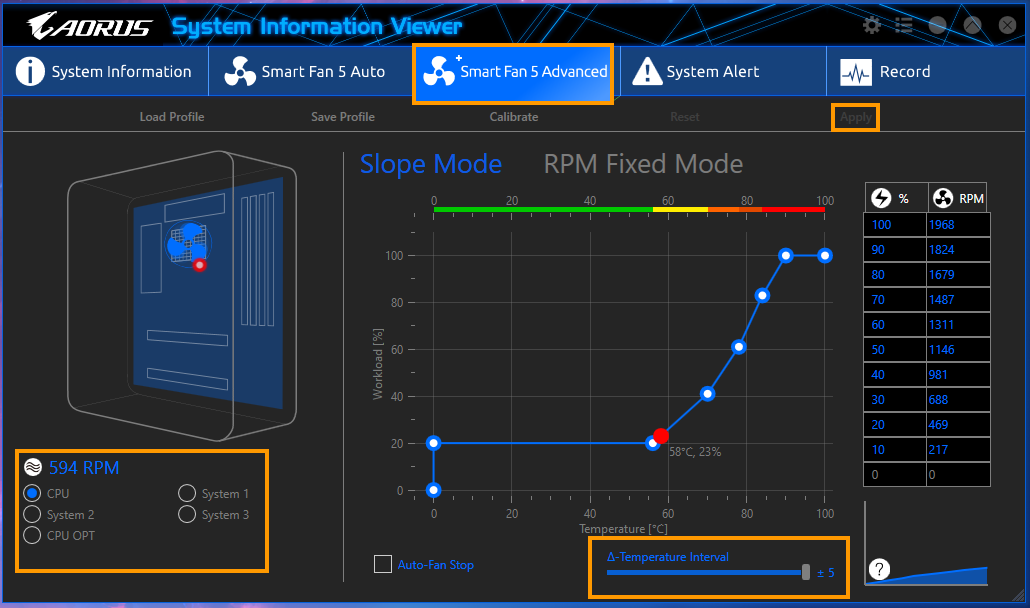
- The rest of the fan curve is entirely up to you, however, I usually adjust the bottom dot to 30% at 50c then adjust the dots in between to make a nice gradual curve. This will probably be different for you though.
- Finally, use the Temperature Interval slider at the bottom to adjust the ramp-up speed (the time it takes for the fans to reach certain speeds). Increasing the time will make all fan speed changes a lot smoother and you won’t get those annoying noise spikes as your fan speed increases for 1 or 2-second temperature fluctuations.
That’s everything, you can now click Apply to save the changes. There is also a checkbox called Auto fan stop you can use if you want your fans to stop entirely once temps fall below your minimum settings. However, I would avoid using this as you want constant air flow all the time, it’s better for all-around PC health.