Table of Contents
If you are a system administrator for a large network of Windows 10 computers, this article will show you how to enable Pin History on Windows 10. A feature of the operating system that allows you to prevent users from using the same pin numbers repeatedly to sign into the operating system.

How to Fix Firefox No Bookmark or Wrong Bookmark Icon (Firefox Bookmark Favicon Missing).
If you haven’t really paid much attention to the contents and features added to the last few versions of Windows 10. There’s a good chance you missed a fair few background features you may actually be curious to learn more about. For example, if you are someone who’s very security-minded, it’s now possible to set up Pin History on Windows 10.
With Pin History enabled on Windows 10, you can prevent users (or yourself) from using the same sign-in details repeatedly. In fact, you can even add a limit to how many pins can’t be reused by the user, with an upper limit of 50. As Windows officially states below:
“This setting specifies the number of past PINs that can be associated to a user account that can’t be reused. This policy enables administrators to enhance security by ensuring that old PINs are not reused continually.”
Related: How to Fix Export & Share Not Working in the Windows 10 Photos App. (Purple Haze)
How Do You Prevent Users Reusing Old Pin Numbers On Windows 10? (Enable Pin History On Windows 10)
To enable Pin History on Windows 10, you’ll need to use the Windows Registry, which for some users can be a little tricky to navigate. If you aren’t confident using the Registry Editor make sure you create a Restore Point before continuing, this will allow you to revert to a working system state should you make a major mistake.
If you haven’t created a restore point before, open the start menu, type Restore, then select Create a Restore Point when it appears on the list. From the new window that appears, click Create in the bottom right section of the screen, then follow the instructions given by Windows. Once you have successfully made a restore point, you can continue.
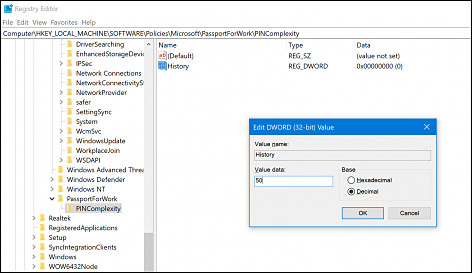
To begin, open the Windows Run tool by pressing Windows Key + R, type regedit into the box, then press Enter. Once you have the registry editor open, navigate to the following location:
HKEY_LOCAL_MACHINE\SOFTWARE\Policies\Microsoft\PassportForWork\PINComplexity
When you get to the location, double-click on the History entry and change the Value Data from 0 to 50 and make sure the base value is set to Decimal. After you have made the change, Restart your computer and Pin History will be ready to go.
How Do You Disable Pin History on Windows 10?
If you already have Pin History enabled but can’t stand it, you can disable it by following the exact same process as shown above to get to the PINComplexity key. Once you have the key open, simply delete the History DWORD, then Restart your computer for the change to take effect.
Can’t Find Pin History on Windows 10?
If you can’t find PINComplexity when you enter the registry on Windows 10, you will have to update your computer to the latest version of Windows 10. Simply creating new Keys and DWORDs won’t add the feature to your system.