Table of Contents
If you have a Windows 10 based device and want to configure your audio settings to better manage consistent sound levels. This article will show you how to turn on volume levelling for whichever sound device you are using for sound playback. A quick and easy way to make sure that all sound playback is consistent and ads don’t play extra loud.
Related: How to block access to Folder Options on Windows 10.
Windows 10 has a lot of different ways you can manage the sound input and output options for all of your connected devices and the apps, programs and games that use them. There are so many options available, you’re sure to be able to find a configuration that works exactly the way you want. Unless you want to play sound back from several different devices at the same time... For some reason that’s not a thing yet.
Getting back on track… Apart from being able to choose exactly where your sound is coming from or going to, you can also enable volume levelling for independent devices. This allows you to level out max volume levels so that ads and other annoying content doesn’t playback louder than everything else you have your volume set for. If you always have to adjust your volume levels because of extra loud bursts of sound, normalised sound settings are going to help you out a lot.
If you only want to configure volume normalization for a specific device, say your headphones This is also possible as all sound output and input devices on Windows 10 are treated separately.
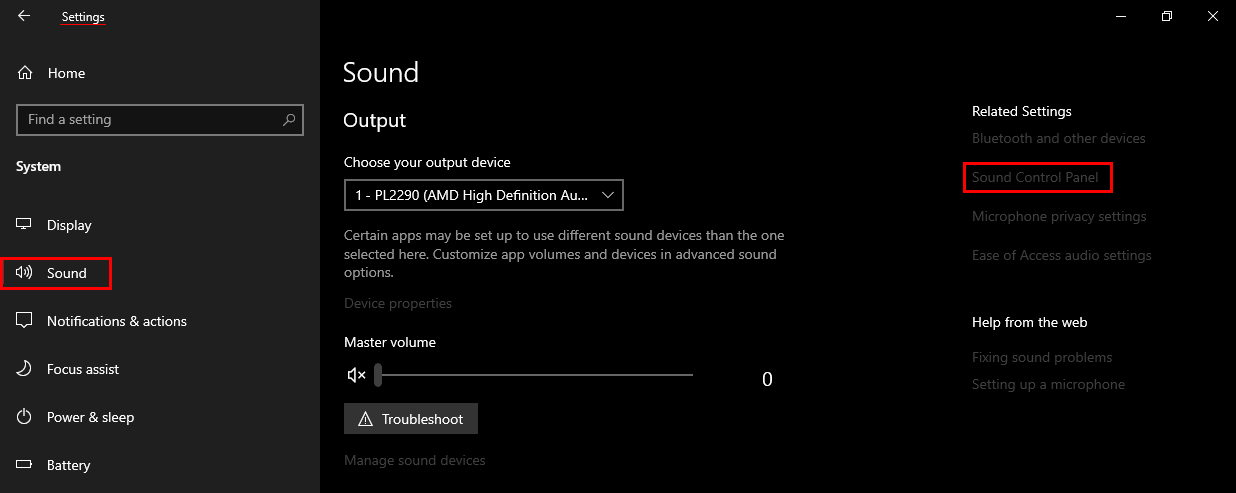
- First go to Settings > System > Sound > Sound Control Panel.
- Next, change to the Playback tab and select your device.
- Now click Properties and place a tick in the Loudness Equalization box and click Apply.
Note: just a quick reminder that not all sound output and input devices for Windows 10 support Loudness Equalization. Some Surface devices do not have this feature.
How do you enable volume levelling for devices on Windows 10? (Loudness Equalization on Windows 10)
- To turn on Loudness Equalization ‘aka’ Volume levelling you’ll need to do the following. First, open Settings then go to System > Sound. Next, over in the right-hand corner click Sound Control Panel.
- In the small new window that appears, stay on the Playback tab, select the device you wish to enable volume levelling on, then click Properties.
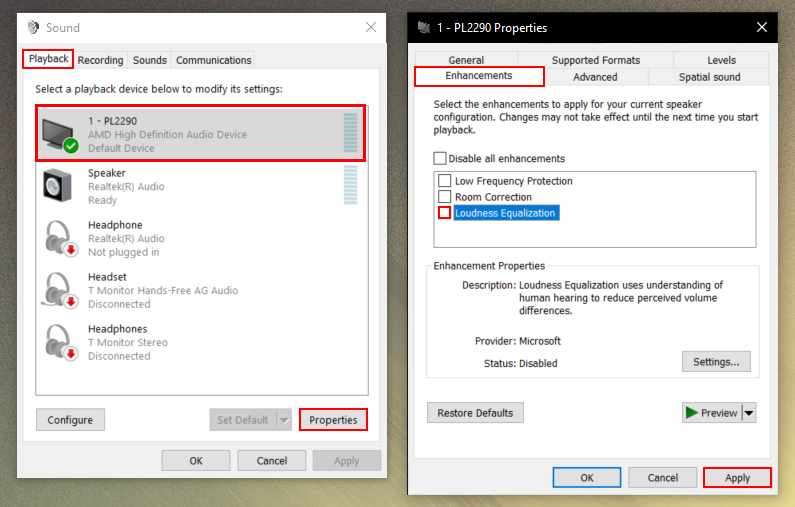
- In the next new window that appears, change to the Enhancements tab, place a tick in the Loudness Equalization checkbox, then click the Apply button. After you have made this change all sound being output by this device will be levelled out using some advanced sound management principles.
If at any stage you wish to disable Loudness Equalization, simply return to the exact same location and remove the tick from the box. Just remember if you switch between playback devices quite a lot you will need to configure Loudness Equalization for each individual device. While you are configuring your sound settings for optimal performance, I also suggest you read our guide on getting a sound Equalizer for Windows 10.