Table of Contents
If you currently use the old/standard version of Microsoft Edge on your Windows 10 PC, this article will show you how to keep it. Block the impeding installation and replacement process of Edge on Windows 10 with Edge Chromium. Microsoft new Internet browser running on the Chromium engine.
After months and months of extensive testing and betas, Microsoft has finally announced that Edge Chromium will be replacing the standard version of Edge in next major Windows update. This means that the current default version of Edge on all Windows 10 versions (apart from business) will no longer be available.
Thankfully, if you don’t want to move on to Edge Chromium just yet, it is possible to block the installation (at least for now) so follow along as this article guides you through the blocking process. Before you begin, however, make sure you have created a System Restore Point just in case you make any mistakes. This will allow you revert back to your previous system state.
Before you go and block Edge Chromium from replacing the current/standard version of Microsoft Edge. I suggest spending a little time with it. It’s quite a good alternative to the current default version of Edge and Google Chrome. Plus it has the added benefit of being able to accept all of Google Chromes current extensions. You’ll need to spend at least a week with it to get any real feeling for it. I’ve been using it for a few months and can say it’s quite good.
Related: How to Make the Search Box on the New Tab Page in Chrome Work. (Not Redirect to the Address Bar)
How Do You Stop Edge Chromium Replacing Edge Windows 10?
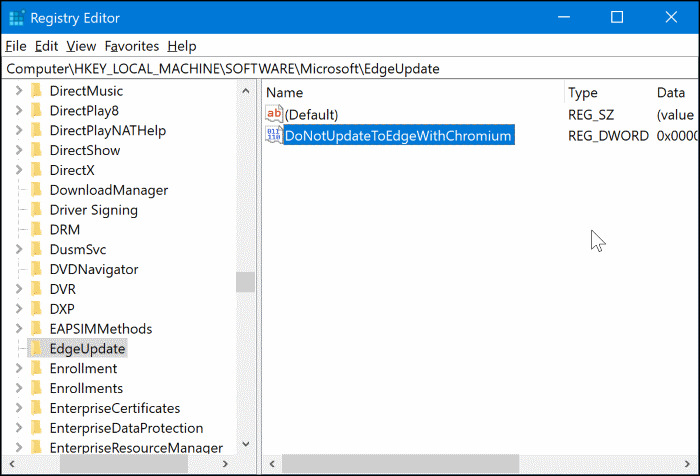
As the new Edge Chromium-based web browser will be automatically pushed to Windows 10 version 1803 and new via Windows Update service, you’ll need to do the following. To begin, open the Registry Editor by typing Regedit.exe into the Start menu, then select it when it appears. Next, use the left-hand pane to navigate to the following location:
Computer\HKEY_LOCAL_MACHINE\SOFTWARE\Microsoft
Now right-click the Microsoft key (folder) select New > Key and name the new entry EdgeUpdate. After this select the EdgeUpdate key (folder), then right-click in the central pane and create a New > DWORD 32-bit Value. Name this entry DoNotUpdateToEdgeWithChromium. Finally, double click this entry and make sure the Value Data is set to 1.
Now simply Restart your computer and the change will take effect. If at any stage you change your mind (and you probably will) you can revert the process by simply deleting the key (folder) you created.
On a Side Note…
If you haven’t already taken advantage of it, make sure you turn on Password Leak Detection in Google Chrome. A new Chrome feature that has been designed to alert you if the password you are using has been found in a data breach. A quick and easy way to add an extra layer of protection to your Internet browsing experience.