If you want to change the lock screen time-out timer on Windows 11 so that the screen doesn’t go black or turn off after 30 seconds. This article will show you how to adjust the lock screen time out time so that the Windows 11 lock screen stays visible for longer than the default 30 seconds.

Table of Contents
Related: How to use Google Play Games on PC.
By default, the lock screen timeout time on Windows 11 is 30 seconds, which means that the screen will go black (off) after 30 seconds of inactivity. While this probably isn’t an issue for some people, there are people out there, like myself who’d like to increase that time to at least one minute. This just makes it a little easier to sign in as your first keypress isn’t used to wake up your screen.
While Windows has a lot of lock screen, screen saver, and display options there aren’t any official options that cover the lock screen time out time. This means the only way to make this change is via the Windows 11 Registry Editor. If you haven’t used the Windows Registry Editor before you’ll need to make a System Restore backup point beforehand. This will make a safe place to restore your PC if you make some kind of dramatic mistake. Though that is unlikely. But it’s always best to be safe.
How do you change the Lock Screen Timeout time on Windows 11? Windows 11 Lockscreen Timeout Time.
Now that you have a System Restore point set, you can start the process of changing the lock screen time out on Windows 11.
- First, open the Registry Editor by searching regedit from the Start menu. When it appears right-click on it and select Run as administrator.
- Next, navigate to the following location using the left-hand pane
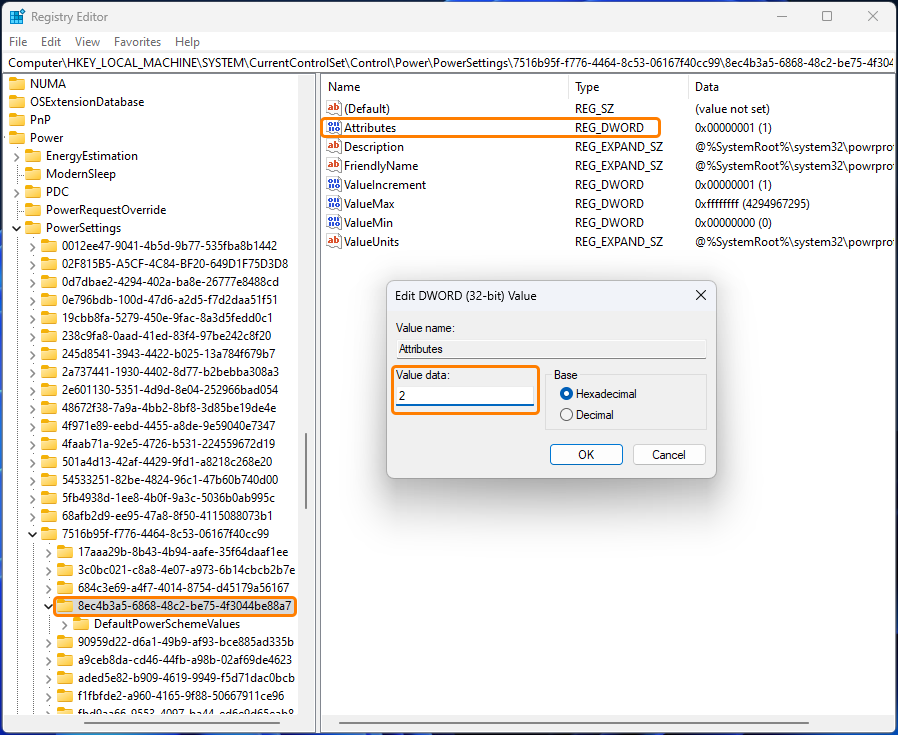
HKEY_LOCAL_MACHINE\SYSTEM\CurrentControlSet\Control\Power\PowerSettings\7516b95f-f776-4464-8c53-06167f40cc99\8EC4B3A5-6868-48c2-BE75-4F3044BE88A7
- Once you are in the correct location double-click the Attributes entry and change the Value data to 2. This will enable an extra option in Control Panel.
Now close the Registry Editor, we’ll be using the Control Panel next. If you made a mistake and are having some problems because of it go back to the System Restore article linked above and restore your computer to an earlier point in time.
Now we can change the Lock screen Time out time using Control Panel.
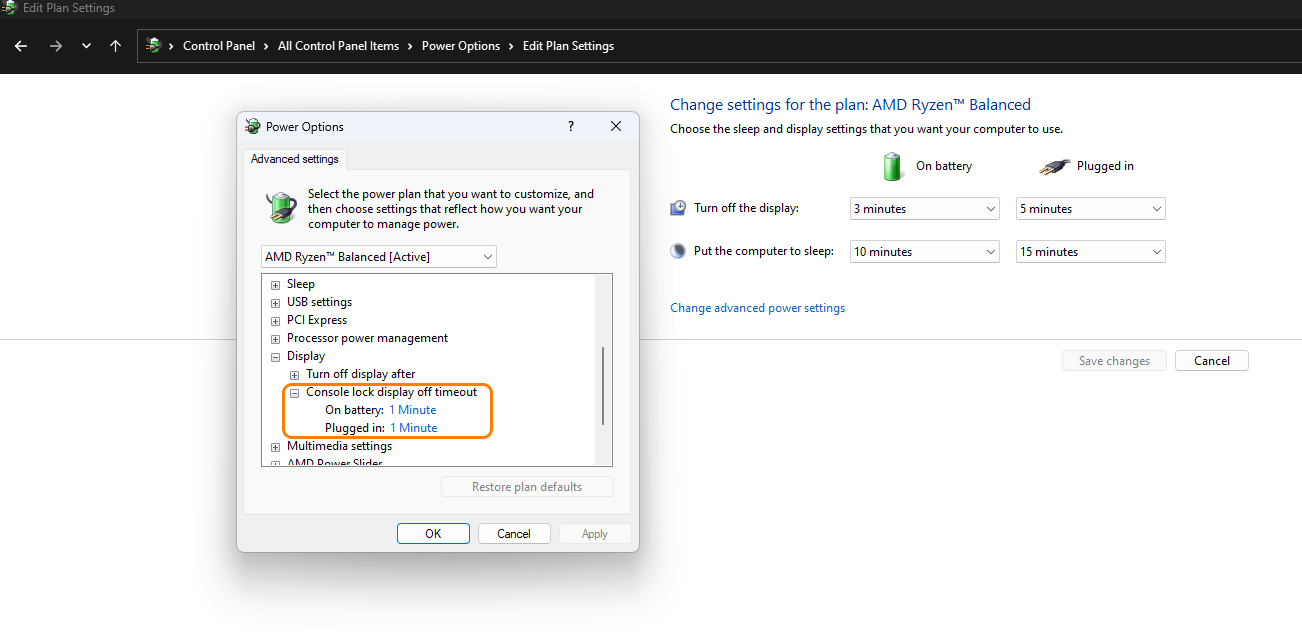
Now that you have enabled Console Lock display off timeout in the Registry, you can make changes in Control Panel.
- The first option Control Panel, then go to Power Power Options > Change Plan settings > Change advanced power settings.
- Now find and expand Display then Console lock display off timeout. Now adjust the time period from 1 minute to whatever you think will best suit your needs. Just make sure you do it for the battery and plugged-in options.
That’s all there is to it! You’re done and can now enjoy increased lock screen, screen on time.
Sick of having to sign in using a password? Just disable the entire lock screen.
If you’d rather not see the lock screen at all and would like to just go straight to the password entry screen make sure you check out the guide below. This will get Windows to boot straight to the password entry screen,
How to disable the Lock screen on Windows 11.
Want to go even further and enable automatic sign-in?
Finally, if you want to sign in automatically without having to use a pin or password you can check out the following guide.
How to sign in to Windows 11 automatically. (Windows 11 automatic sign-in)