Table of Contents
If you are starting to think that ads on YouTube and other services are playing content with sound far louder than everything else you listen to, you aren’t imagining things. Ads, especially movie trailers consistently play at far higher levels in order to drive their message home. Luckily it is possible to normalise all sound on Windows 10, so follow along as this guide takes you through the process.
How to Fix Export & Share Not Working in the Windows 10 Photos App. (Purple Haze)
Just like on TV ads and other annoying content found on the Internet generally tend to push boundaries when it comes to volume levels. So if you’ve always had a suspicion that movie trailers and other ads you come across online were far louder than everything else, your hunch has been correct.
Although most people generally couldn’t be bothered taking action, Windows 10 does give you quite a few sound options that will allow you to bring down the volume of ads and any other content that plays far louder than it should. The option is known by three different names: volume levelling, volume equalising, and volume normalising.
Once you’ve made the change all the sound coming out of your computer will be levelled out to the same basic volume, including music tracks, movies, games, etc. You won’t have to worry about anything playing with absurd volume differences.
Related: How to Remove, Hide the User Account Picture on the Windows 10 Sign-in Screen.
How Do You Turn on Volume Levelling on Windows 10? (Normalise/Equalise Sound on Windows 10)
Before you begin, it is important to note that there are a few devices and sound drivers that may not support this feature, including Surface Pro 3 devices. If you aren’t sure if your device supports the feature the quickest and easiest way is to simply attempt to make the change. If you see the option, your device supports it, if you don’t, it doesn’t. This is far easier than trying to search for device driver specs online.
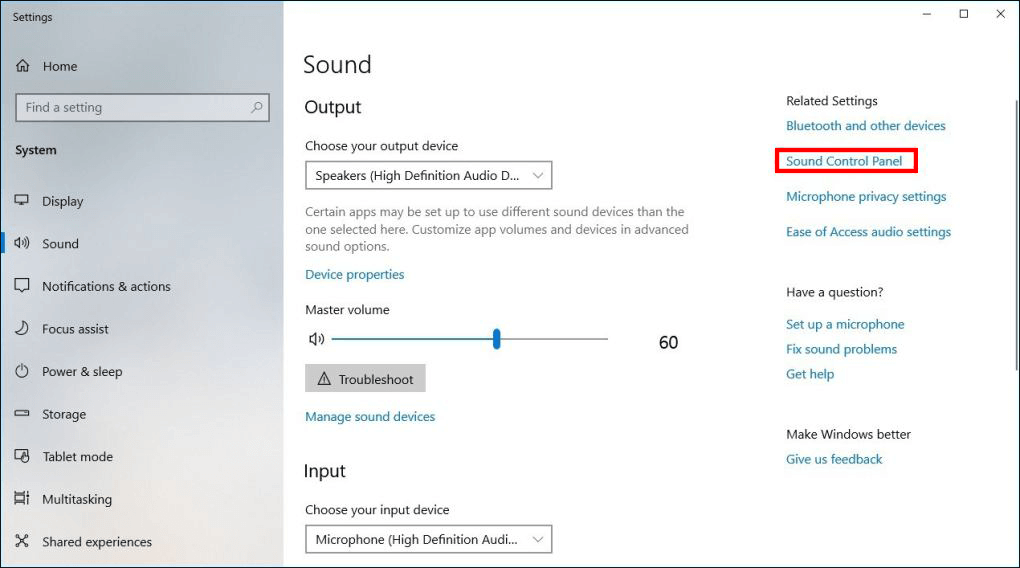
To begin, open Settings, click System, then click Sound. Next, under Related Settings in the right-hand pane, click Sound Control Panel.
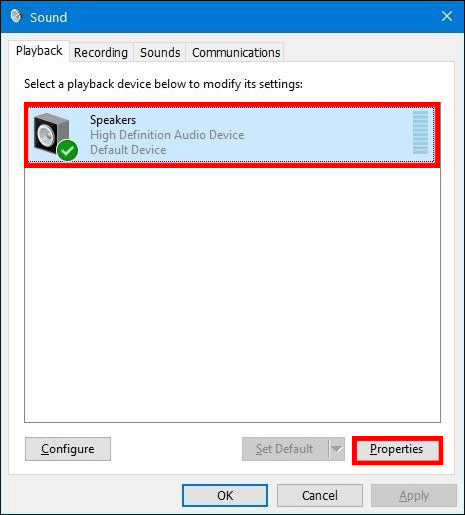
This will take you to advanced sound options where you will need to change to the Playback tab. Here select the speaker currently set as your default (it will have a green tick next to it), then click Properties in the bottom right-hand corner of the window.
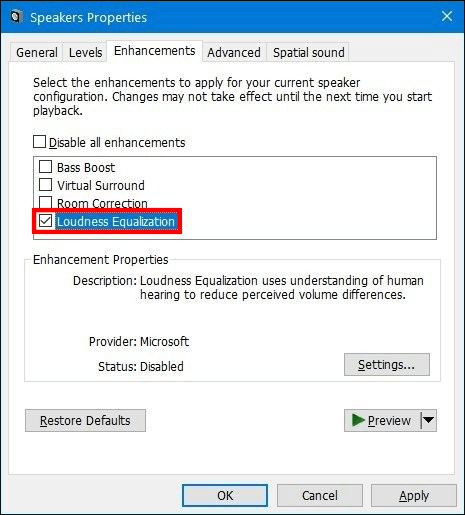
Here change to the Enhancements tab and make sure the Loudness Equalisation box has a tick in it. For the final step, click Apply, then Ok to save the changes. After making the change you should notice a considerable difference between loud sounds and quiet sounds, things should balance out a lot better. Even though this is a blanket solution for your entire system, most programs and apps that support audio playback usually have built-in equalisers that you can fine-tune sound levels with even further.
On a Side Note…
If you also happen to be having issues with Google Chrome downloads getting stuck at 100% downloaded but not actually finishing, make sure you check out the following article which will guide you through several different fixes.
How to Fix Downloads on Google Chrome Getting Stuck at 100%.