If you are using CapCut to create content for YouTube, TikTok, or other social media and video platforms but are having major issues with lag and slow performance. This article will guide you through several different troubleshooting steps you can use to get a far better video editing experience with dramatic performance improvements. You won't have to deal with choppy playback and will instead enjoy smoothly flowing footage.

Table of Contents
Related: How to Fix SD Card not showing up on Windows 11.
Laggy playback and bad performance from video editors like CapCut, Davinci Resolve, Premiere Pro and all of the others isn't anything new and something that most people will experience when first starting out with a dedicated editor. While a lot of these problems are hardware-related and come from simply not having a powerful enough PC. It is possible to fix playback lag, stuttering and just general poor performance in CapCut and all of the other editors in some situations. By default, most of these settings and options aren't enabled by default so you will have to manually configure them. Which is exactly what we're going to be doing in this guide.
To begin, make sure that you have the latest version of Capcut and have updated Windows. This will ensure you have all the latest bug fixes and reduce compatibility issues that may be lurking in older versions. Restart your computer one more time just to make sure everything is in order thing do the following.
How to fix CapCut Lagging and Playback issues.
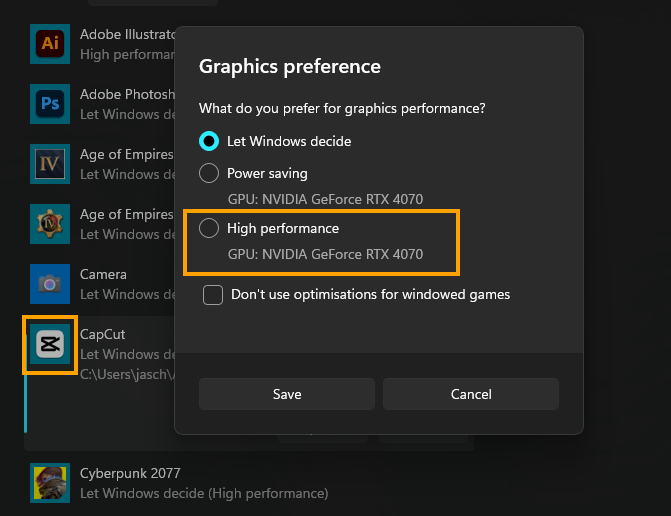
Now that you have completed all the pre-start steps the first thing we are going to do is to make sure that Windows is using the correct hardware on your device.
To begin, open Settings and to go Display > Graphics then find CapCut in the list of programs. If it's not listed click Browse and add the CapCut.exe found in:
C:\Users\USERNAME\AppData\Local\CapCut
Once you have added it click Options and set it to High Performance. This will make sure it uses your best hardware device.
Start Using Proxies in CapCut for a Lag Free Performance Boost.
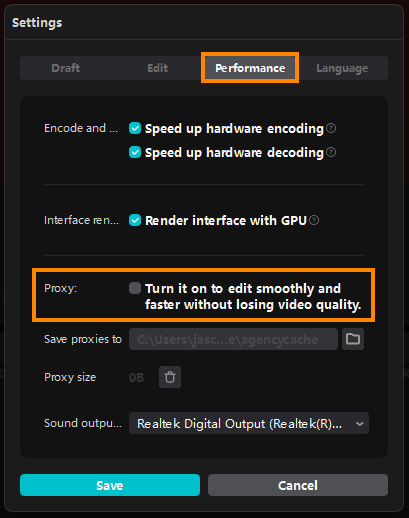
With Windows Settings organised it's now time to enable Proxies in CapCut.
- To do this open CapCut and a Project.
- Next, click Menu > Settings in the top left-hand corner then change to the Performance tab in the window that appears.
- Here make sure Proxy: Turn it on to edit smoothly and faster without losing Video Quality.
- ClickSave and you're done.
By adjusting these few things you will get a big optimization boost and get way better capabilities in the CapCut app. Don't worry about your internet connection it doesn't play a role in anything here and is an unnecessary component unless you are using some of the minor ai features but they aren't causing any of the lag problems you may be facing. Just remember you want to keep everything as up-to-date as possible as well as outdated software causes problems
Why you need to Use Proxies in CapCut on Laptops and low-end devices.
Improved Performance, NO LAG!
Original high-resolution video files are resource-intensive and will cause playback lag or stuttering during editing and playback. Even with a big render cache configured.
Proxies are lower in resolution and require less processing power, allowing for smoother playback and real-time editing, even on less powerful hardware which is commonly found in laptops.
Fast Smooth Editing
Proxies make the editing process more responsive, as they are easier to manipulate and require less time for rendering changes.
Editors can make quick adjustments without waiting for the system to process the full-resolution footage.
Fast Exporting
When the editing is complete, the system can use the original high-resolution files for final rendering.