If you've recently upgraded your monitor with a model that has NVIDIA G-Sync or AMD FreeSync and are now experiencing flickering issues in Adobe Premiere Pro with G-Sync or Free Sync enabled. This article will show you with several solutions to solve the problem and eliminate or at least significantly reduce the flickering when G-Sync or FreeSync is enabled.

Takeaways:
- What is causing flickering in Premere Pro when enabling FreeSync or G-Sync on Windows.
- How to fix flickering in Premere Pro when G-Sync is enabled on Windows.
- How to fix flickering in Premere Pro when FreeSync is enabled on Windows.
Table of Contents
How to fix Flickering in Premiere Pro when G-Sync or FreeSync is Enabled.
Disable the Windows Multiplane Overlay which It has been known for years to cause a lot of flickering, green screens, stutters when resizing windows. Disabling "Should" stop all flickering issues across your system. This is also generally why you will encounter this issue a lot more when using multiple monitors.
- Open registry editor and go to:
Computer\\HKEY\_LOCAL\_MACHINE\\SOFTWARE\\Microsoft\\Windows\\Dwm
- Right click in blank space and click: New > DWORD (32-bit) Value
- Name it: OverlayTestMode
- Right click it and Select "Modify" then change the Value from 0 to 5 and hit OK
- Restart PC and you're done.
If you have any issues after doing this, just delete the entry you created and after a restart you should be back to normal. If not keeping following the steps below.
Start Using Custom Refresh Rates.
One of the best and easiest solutions for this issue is to manually configure the maximum frame rates for Adobe Premiere Pro using the NVIDIA Control Panel. This will enable you to cap frame rates to a set level that should stop the flickering.
- To do this, open the NVIDIA Control Panel, go to 3D settings, and switch to the Program tab.
- Now scroll down and set the frame rate cap below your monitor's maximum. I recommend trying 120, 100, 90, or 60 in that order. Keep in mind that this may take some trial and error to solve. If this doesn't work, lock it in at 60 and try the next solution.
- You can also try disabling V-Sync as well. This isn't a must but it can work for some people so give it a try.
Update your graphics drivers: Use DDU (Display Driver Uninstaller)
Another solution is to update your graphics drivers using the Display Driver Uninstaller (DDU). A traditional uninstallation may not solve all the problems that cause the flickering issues. Therefore, it's recommended to use DDU instead.
- Before using DDU, ensure that you've downloaded the latest graphics drivers from your computer or graphics card manufacturer's website.
- After downloading the driver, turn off your internet connection, run DDU, and enable the tick box next to Remove GeForce Experience (GFE) when it appears.
- After restarting your system, install the driver software, and re-enable your internet connection. This will ensure that Windows doesn't try to install a generic driver in the background. If the problem returns, repeat the process again.
Disable G-Sync or FreeSync
Disabling G-Sync or FreeSync is another option, although not ideal, as you've invested in this feature. However, if nothing else has worked, this may be the only solution.
Adjust your monitor settings
Finally, adjusting your monitor settings may help. Some users have reported that the issue is worse when using multiple monitors. Disconnecting your other monitors and using a single monitor may solve the problem for some users.
Try Disabling All of the following in Windows Settings
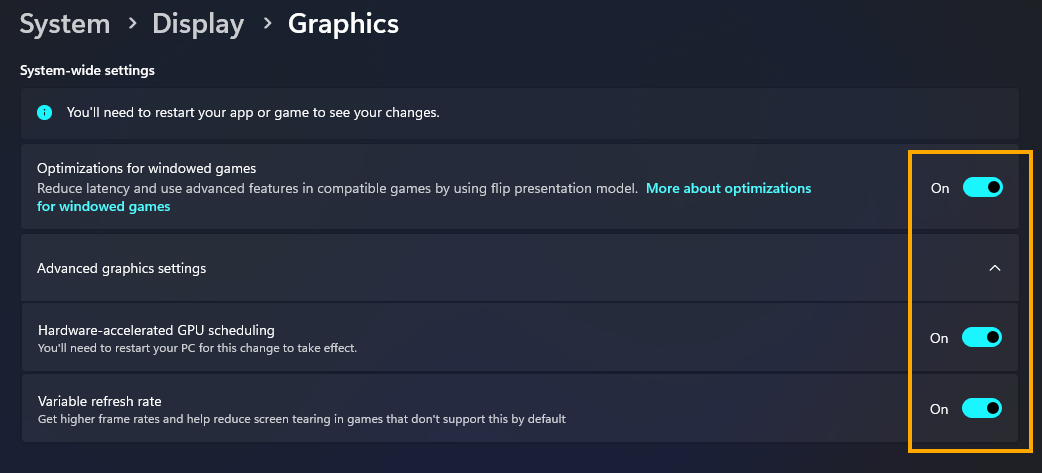
- If nothing so far has worked you can go Settings > Display > Graphics.
- Here expand Advanced Graphics Settings and disable the following options one by one. Make sure you restart after each. If you notice disabling one solves the problem you’ve found the cause. It’s basically just a process of trial and error.
- Hardware-accelerated GPU scheduling
- Optimizations for windowed games
- Variable refresh rate
What's the Problem?
NVIDIA G-Sync and AMD FreeSync offer improved performance and visuals in games and video content. However, they can also come with complications that are often overlooked. Depending on your hardware setup, you may experience slightly different issues. For instance, when using a GTX 1070, you may experience flickering issues in some games with FreeSync enabled. However, after upgrading to an RTX 4070, you may experience flickering issues in Premiere Pro and other Adobe software, but not in games. The problem can, therefore, be hardware or software related.
In a previous article, we discussed fixing screen flickering issues when FreeSync or G-Sync is enabled for games. In this article, we'll go through various potential solutions for Premiere Pro flickering when G-Sync or FreeSync is enabled. While there isn't a single fix that works for everyone, we'll provide you with some of the solutions that work most of the time.