Table of Contents
If you are currently in the process of customising your Windows 10 desktop, this article will show you how to remove the fill colour from the selection tool on Windows 10. The tool that is used to make file selections within most parts of the operating system.

How to Fix: Windows Update Cannot Currently Check For Updates Because Updates are Controlled.
Windows 10 isn’t the world’s most customisable operating system but it does give you quite a few decent core themes, colour aspects and background options. It also allows you to switch between light and dark modes within most areas of the operating system. That being said the new version 1809 dark theme still needs a bit of work to be fully integrated.
Another area of the operating system that a lot of users quite often miss when customising their system look is the selection tool. In the past, we have covered How to Change the Colour of the Selection Tool on Windows 10. which lets you change every colour aspect of the selection tool. However, for this guide, we will show you how to remove the colour from the selection tool altogether, just like in the example below.

Related: How to Change the Colour of Folders on Windows 10.
How Do You Remove the Colour From Inside the Selection Tool on Windows 10?
Surprisingly there are two different ways to remove the colour from inside the selection tool on Windows 10. The first way is relatively easy and can be done from the System Properties tool. The second on the other hand is done using the Registry Editor and is a little more complicated but yields the same results.
Remove Colour From the Selection Tool on Windows 10 From Advanced System Properties.
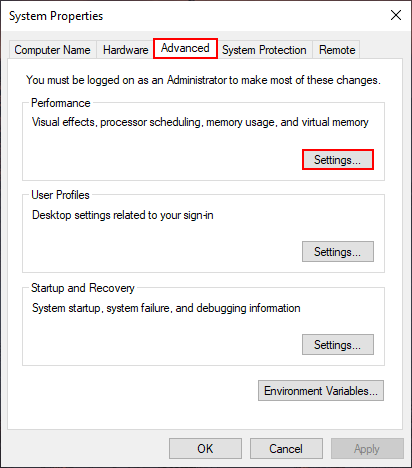
To begin, press Windows Key + R to open the Run tool, then enter the following command into the tool and press Enter.
SystemPropertiesAdvanced
This will open the Advanced System Properties menu. Next, make sure you are on the Advanced tab and click Settings under the Performance heading.
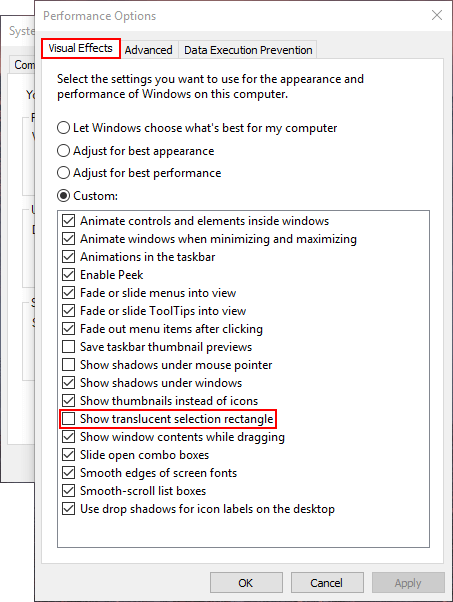
This will open a long list of items, simply untick the box next to Show translucent selection rectangle, then click Ok and you’re done.
Remove Colour From the Selection Tool on Windows 10 Using the Windows Registry.
Unlike the first option for removing the colour from the selection tool on Windows 10, this option is a little more risky, as any mistakes can cause your system to become unstable. Because of this risk, it’s important to make sure you have a System Restore Point to revert back to if something goes wrong.
If you haven’t created a restore point before, open the start menu, type Restore, then select Create a Restore Point when it appears on the list. In the new window that appears on the screen, click Create in the bottom right corner of the screen, then follow the on-screen instructions.
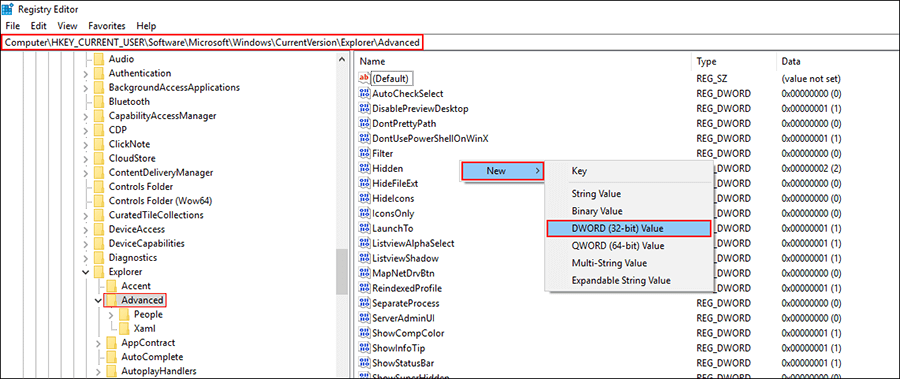
Once your restore point has been created, open the Windows Registry Editor by pressing Windows Key + R, then type regedit into the Run tool text box and press Enter. When you have the tool open in front of you, navigate to the following location using the left-hand pane of the Registry Editor.
HKEY_CURRENT_USER\Software\Microsoft\Windows\CurrentVersion\Explorer\Advanced
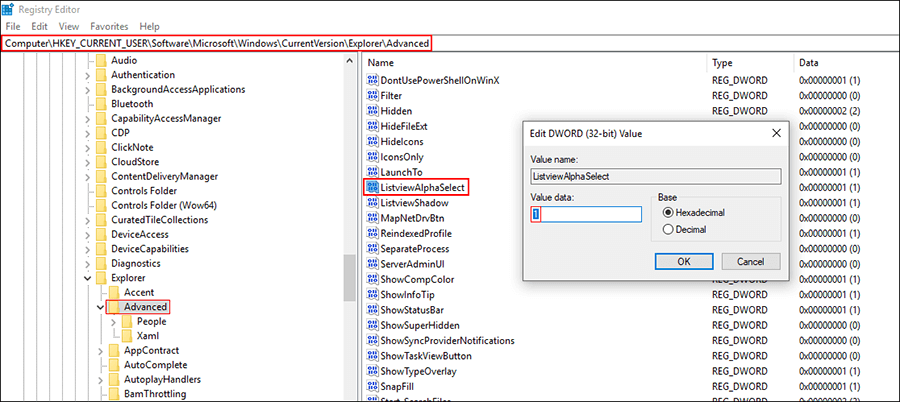
Now you are in the correct location find ListviewAlphaSelect in the central pane, double-click on it, then change its value to from 1 to 0.
If you can’t find a file called ListviewAlphaSelect, right-click the central pane and create a New > DWORD (32-bit) Value, and name it ListviewAlphaSelect. Then simply change its value to 0. If at any stage you wish to re-enable the translucent selection tool, return to the same location and change the value back to 1. As a reminder, don’t forget that you can also change the colour of the selection tool as well.