If you are trying to play Palworld on a dedicated server that you are hosting yourself. This article will guide you through the entire process of creating a server to play Palworld on. As with most dedicated server guides it's going to be very details and very long so work your way through the steps slowly so that you don't make any mistakes.

Table of Contents
Key Points
- How to Set Up a Palworld Dedicated Server - Creating a Palworld Server.
- How and Where to Download the Palworld Dedicated Server Tool
- Preparing to Launch Your Palworld Dedicated Server
- Generating Files & Configuring a Dedicated Palworld Server
- How to Launch Your Dedicated Palworld Server
- How to Save and Exit Your Dedicated Palworld Server
- How to Let Players Join Your Dedicated Palworld Local Network Server
Just so you are aware the Steam version of Palworld allows 32 players per server (but no crossplay).
The Xbox store PC version (Game Pass) only supports the same 4-player co-op mode but does allow cross-play with the Xbox.
Is the Palworld Dedicated Server Setup Free?
As long as your computer is on, and running the server people will be able to join you. That is if you’ve set everything up correctly
Downloading Palworld Dedicated Server
While you can quickly and easily download the Palworld Server Tool from Steam, the following process is a better way of doing things for three reasons.
- It uses less resources than running Steam
- Doesn’t require an account.
- If you don’t own the game on Steam this is generally easier.
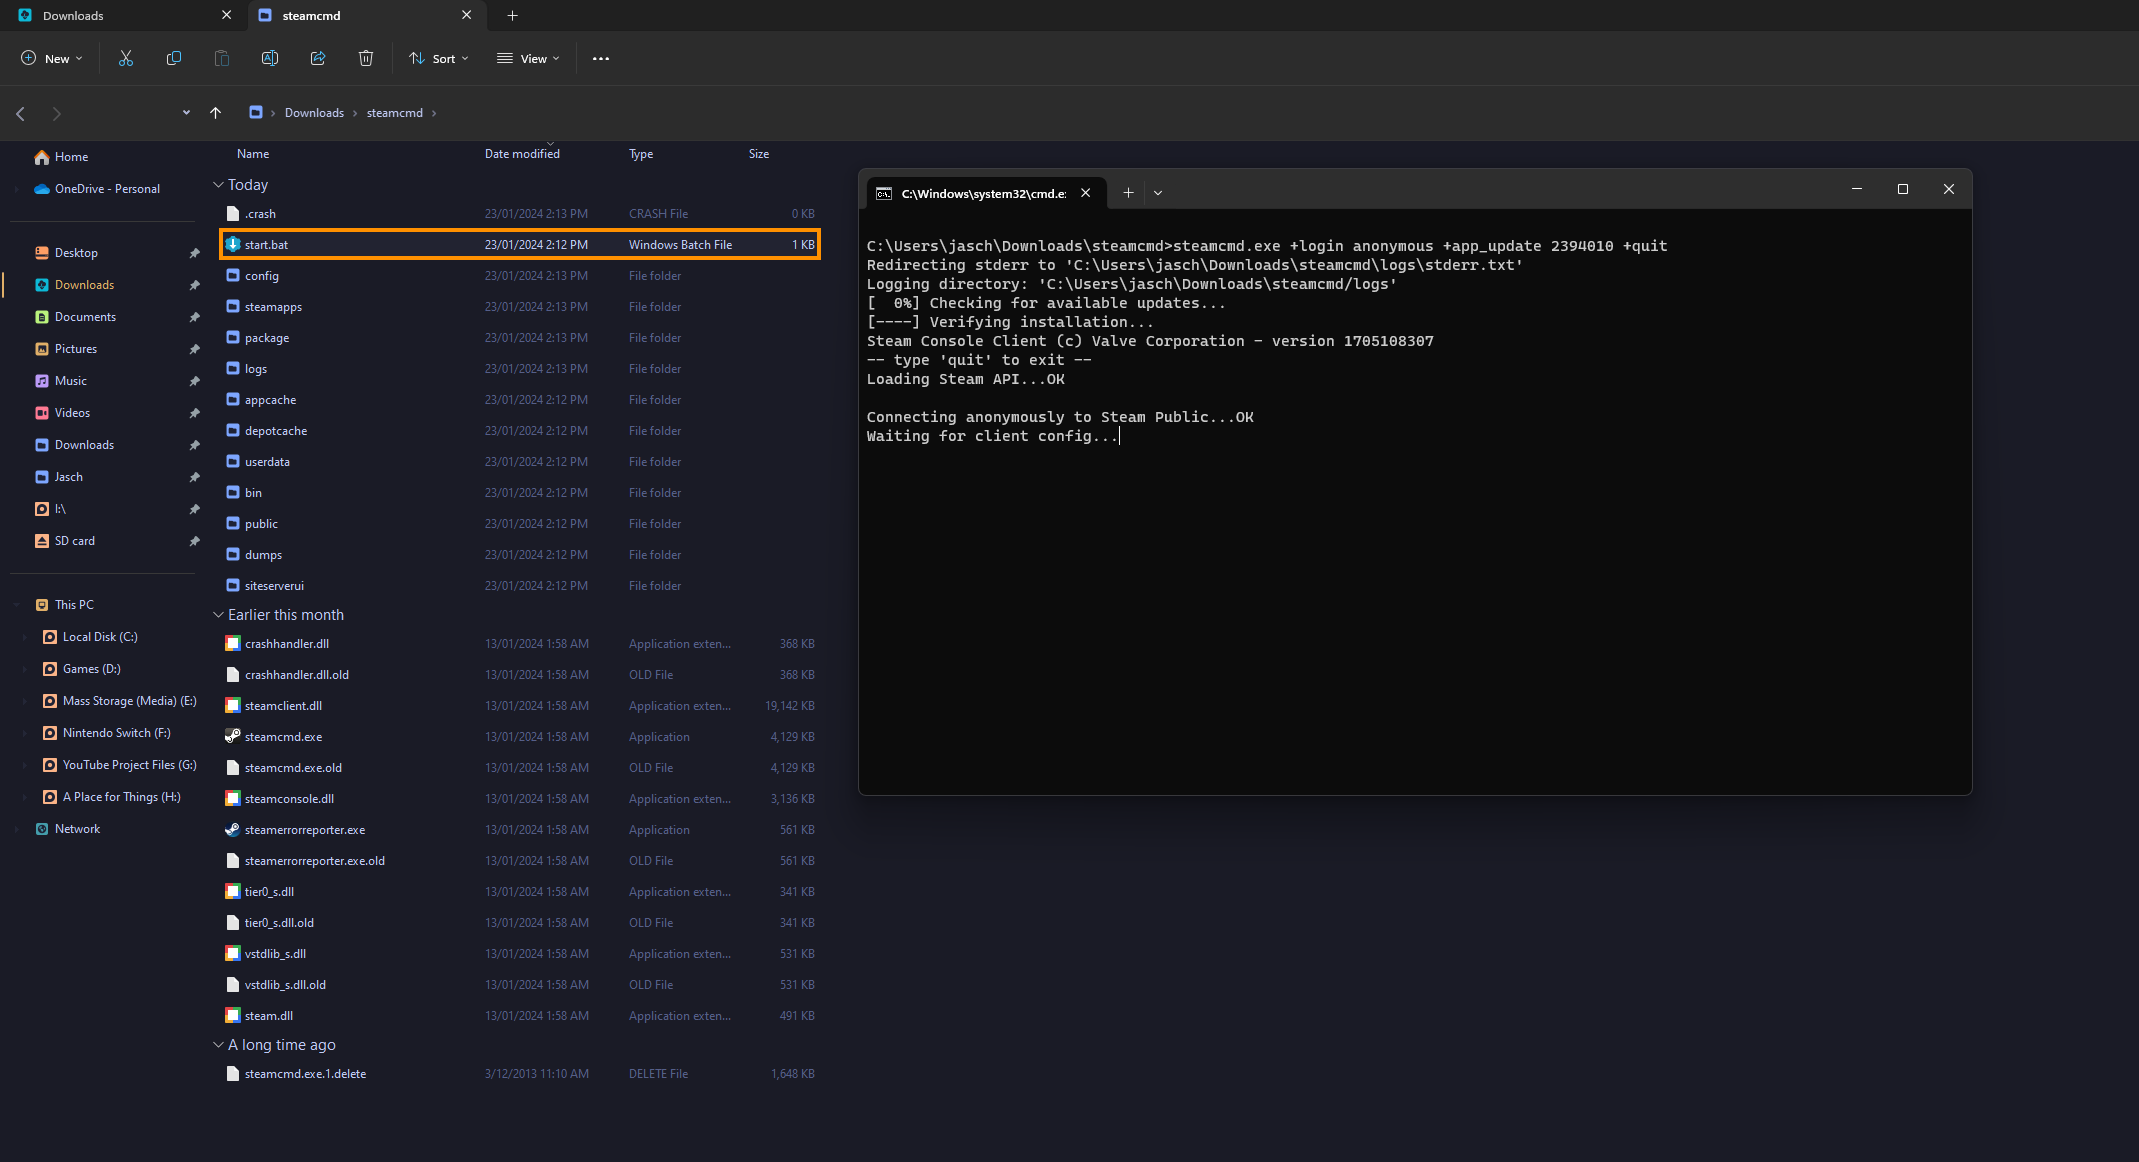
First, we’ll use SteamCMD to get the dedicated server files.
-
Extract into a folder where you’ll install the server.
-
Copy the following command:
steamcmd.exe +login anonymous +app_update 2394010 +quit
-
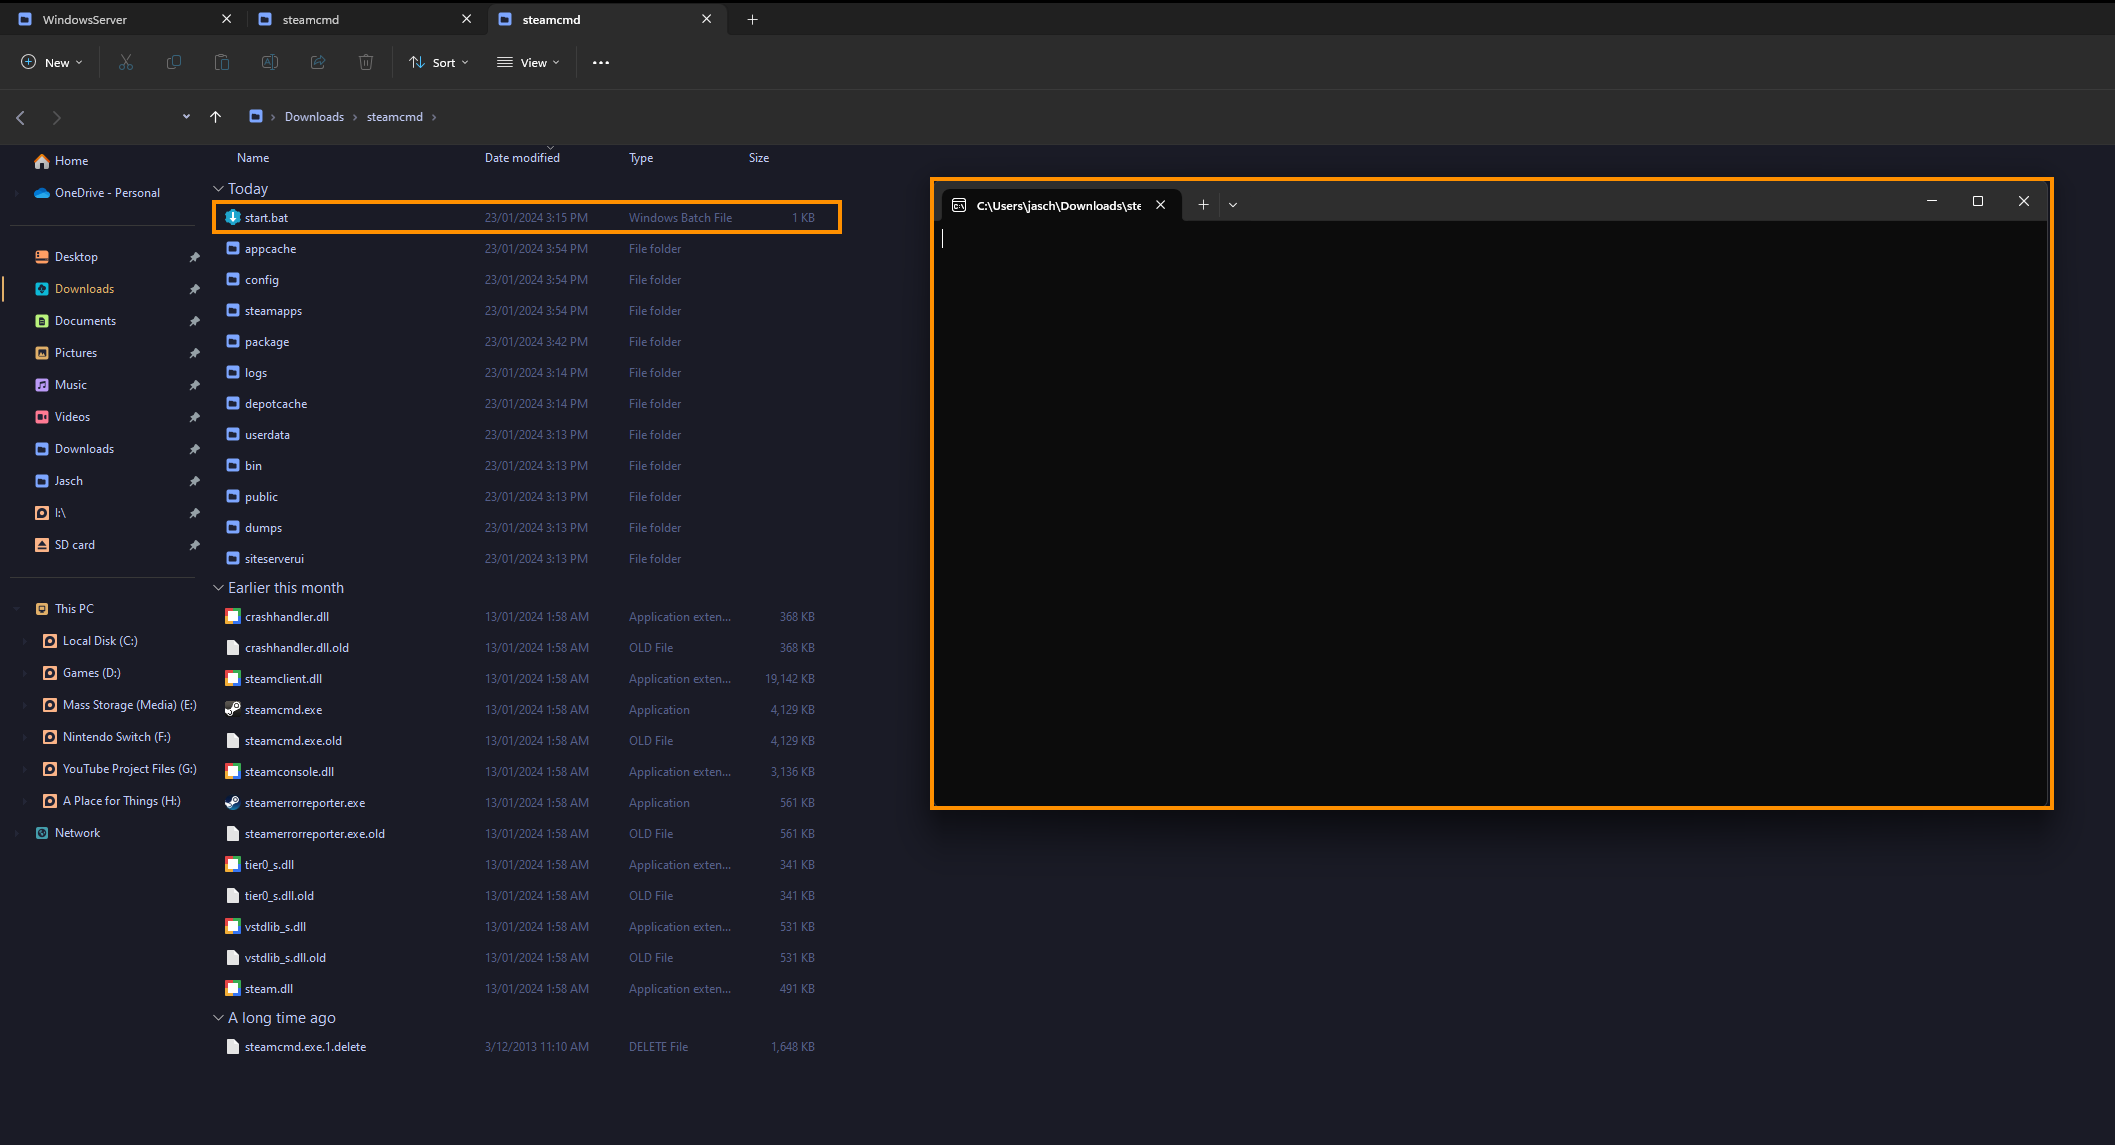
Then open Notepad and paste the command into Notepad. Finally save the file and name it start.bat. Remove .txt from the extension.
This will convert the notepad file into a batch file that will open Command Prompt and download everything we need. Basically, it is used to start the server after auto-updating pre-launch. -
Now just run the file, and wait for the downloads to complete.
Preparing to launch your Palworld Server
If you downloaded with SteamCMD, edit your existing start.bat file and replace everything so it appears as follows:
@echo off
echo Checking for updates...
steamcmd.exe +login anonymous +app_update 2394010 +quit
echo Launching server
cd .\steamapps\common\PalServer
start PalServer.exe -ServerName="YOUR SERVER NAME" -port=8211 -players=32 -log -nosteam -useperfthreads -NoAsyncLoadingThread -UseMultithreadForDS EpicApp=PalServer
Note: Make sure you replace "YOUR SERVER NAME" with your server name.
The EpicApp=PalServer component will add your server to the list of public servers. If you do not want this happening, remove: EpicApp=PalServer from the command.
Generating Files & Configuring server
- Navigate to the steamapps\common\PalServer folder, here you’ll see DefaultPalWorldSettings.ini. Open this file with any text editor. Notepad for example.
- Copy everything, including [/Script/Pal.PalGameWorldSettings] to the end of the file.
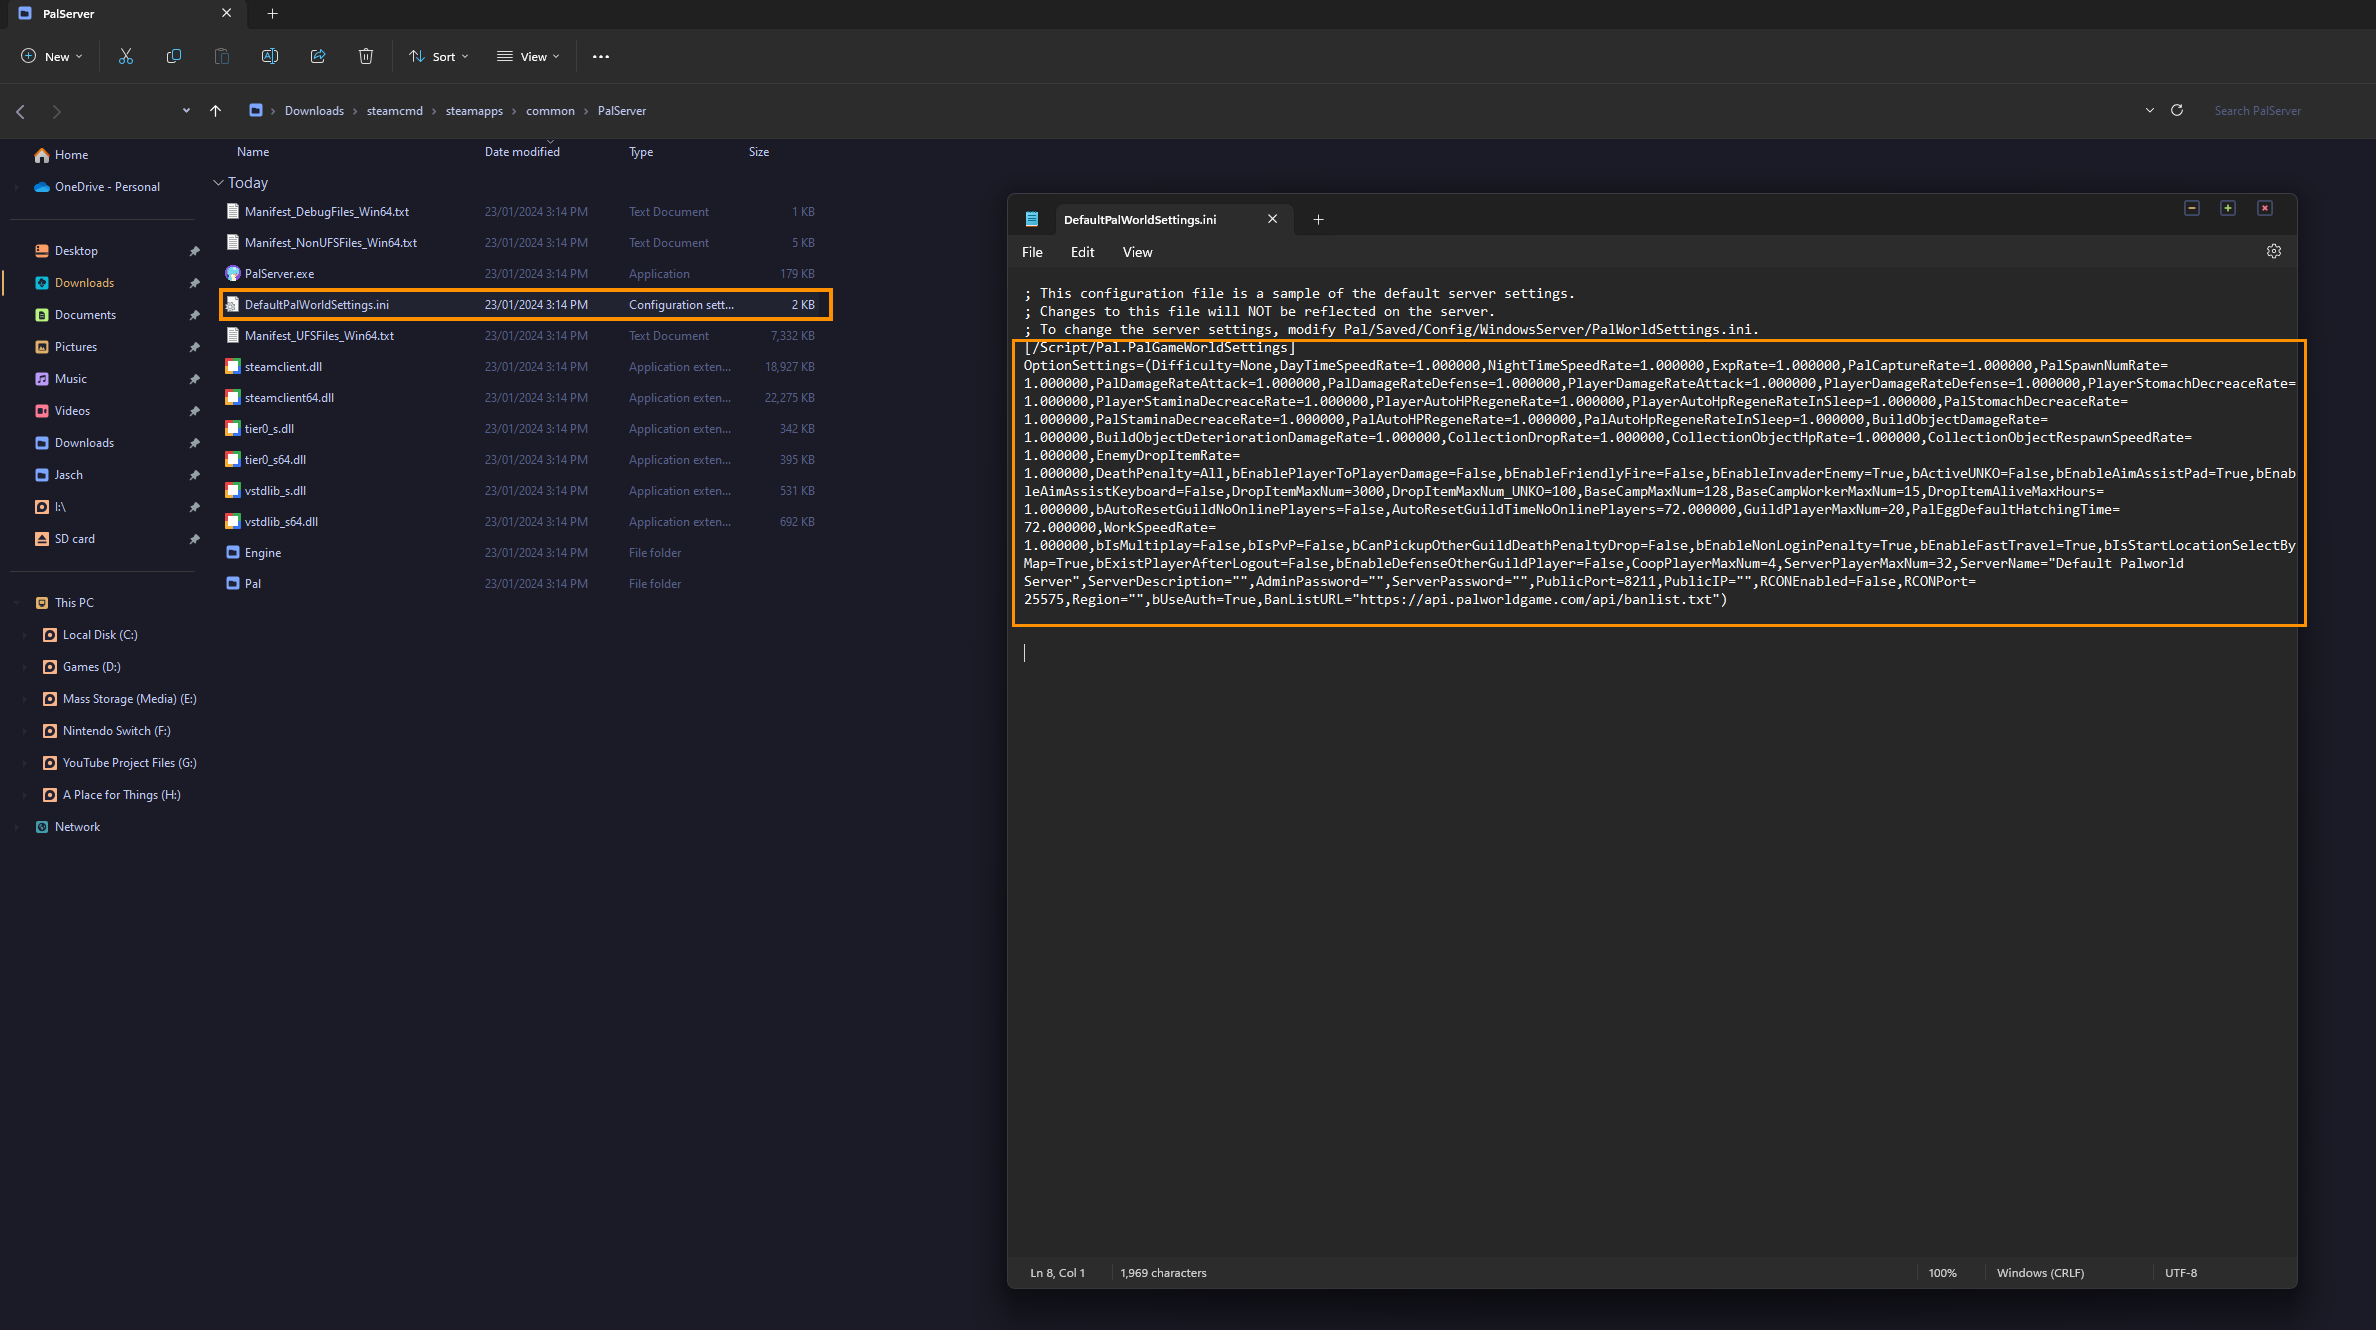
- Now go to Pal\Saved\Config\WindowsServer and open PalWorldSettings.ini. Paste everything you just copied into this location.
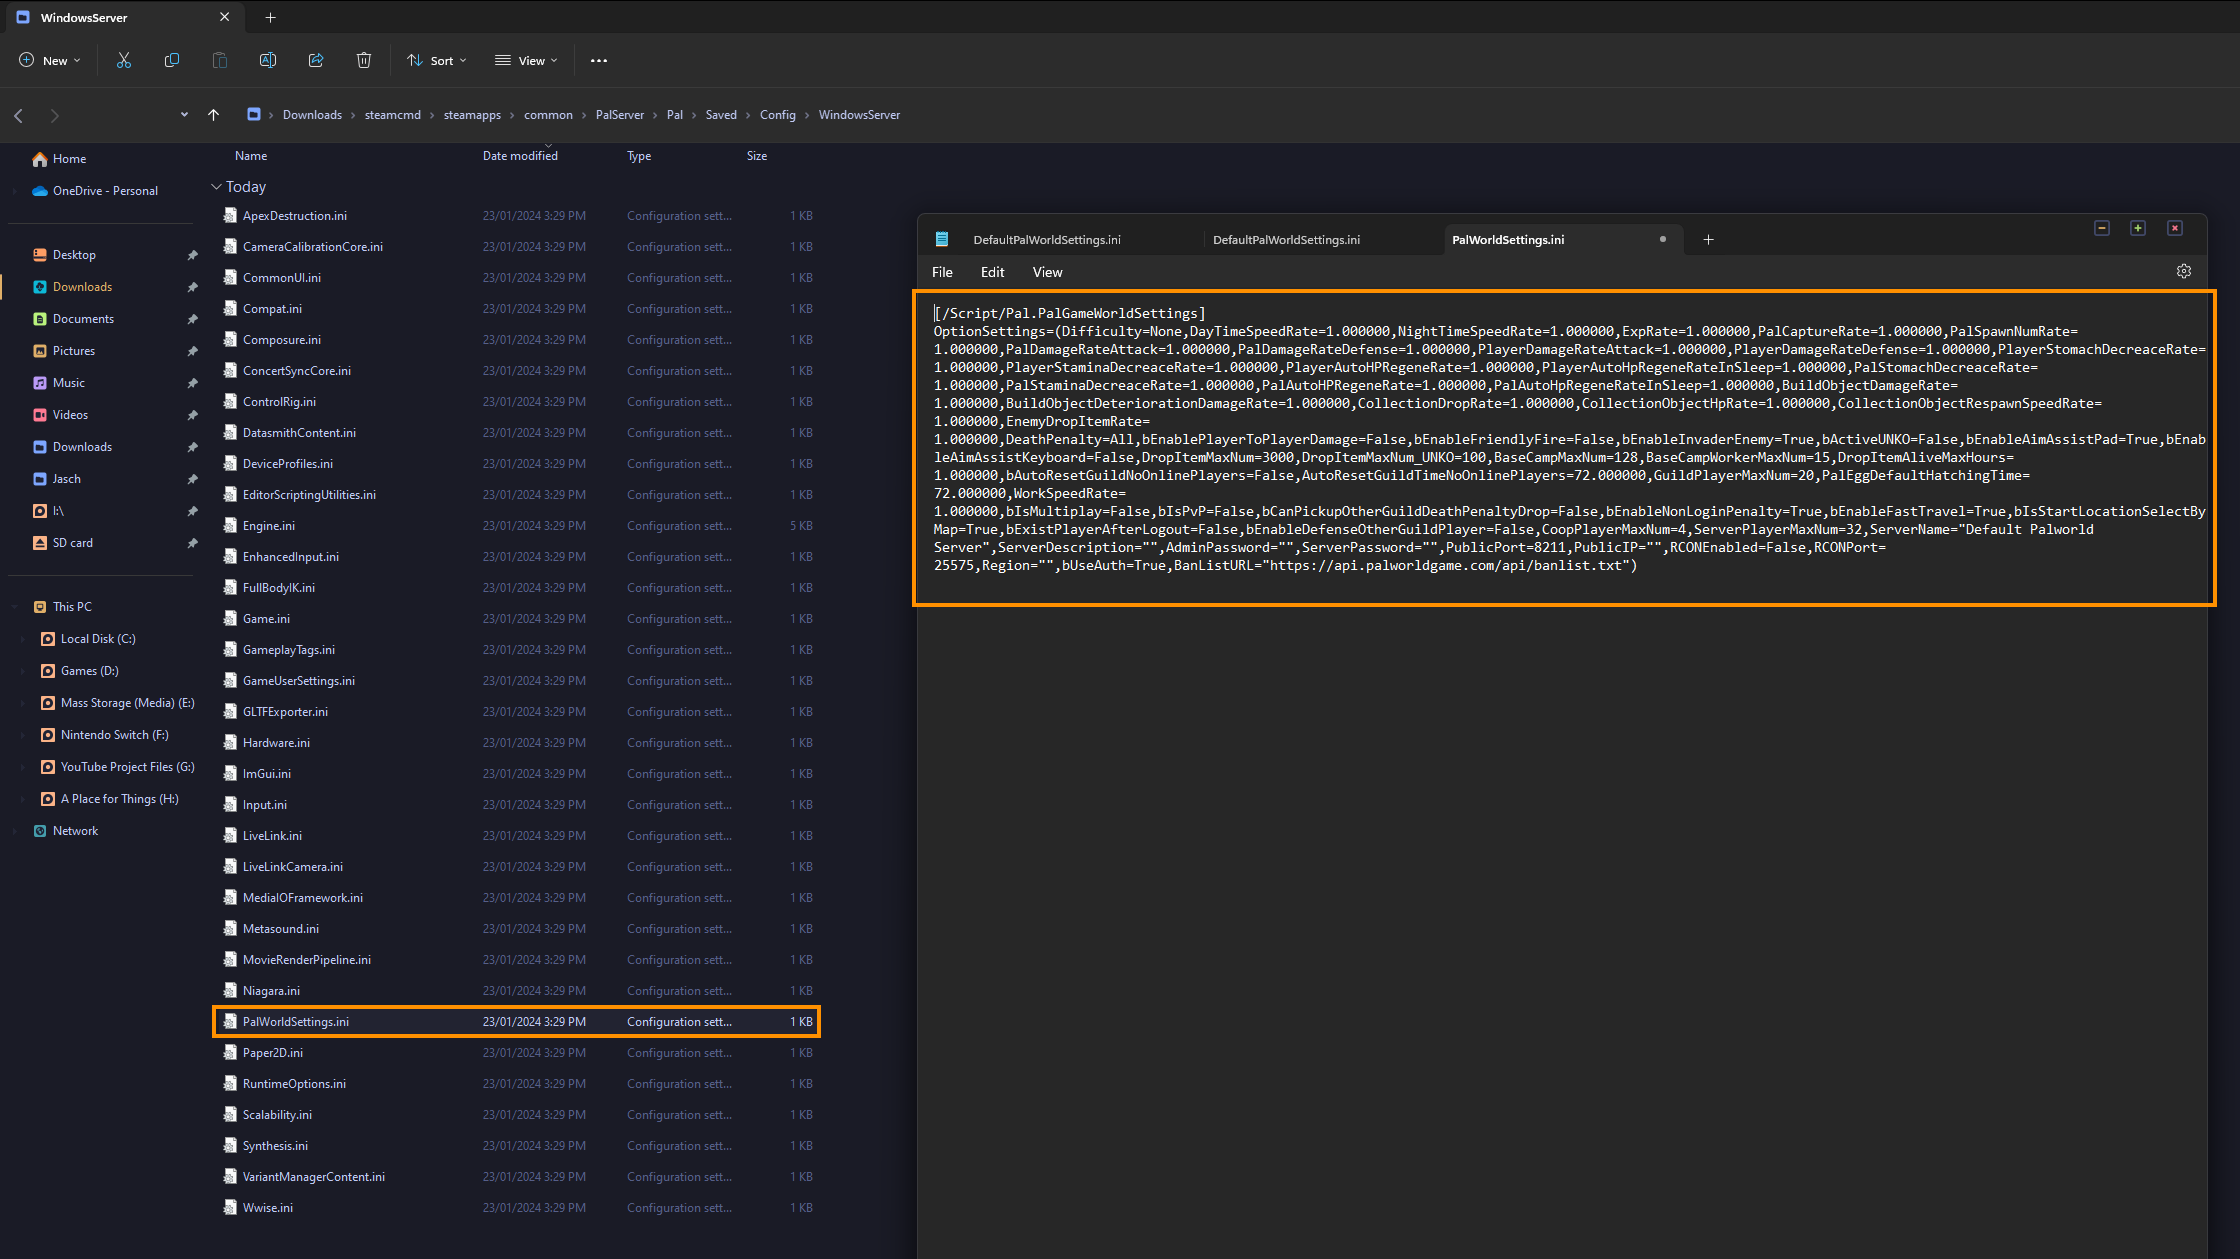
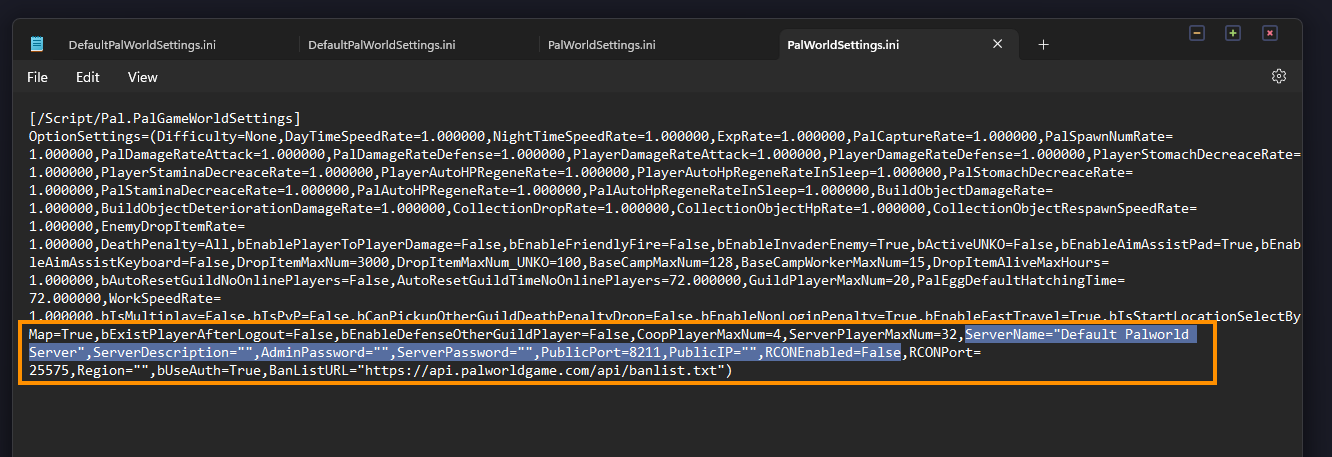
- Replace all of the details with the ones you are using: ServerName, ServerDescription, AdminPassword, ServerPassword (optionally), and RCONEnabled.
It should look something like the example below when you are finished.
ServerName="YOUR SERVER NAME",ServerDescription="",AdminPassword="34444355s",ServerPassword="",PublicPort=8211,PublicIP="",RCONEnabled=False
Launching Your Dedicated Palworld Server
- Now that everything is configured you can launch your server.
- If you downloaded with SteamCMD, you head back and run the start.bat file
How to Join your New Dedicated Palworld server
Now your server is running and you should be able to join it using 127.0.0.1:8211.
At this point in time no one online (from the Internet) can join this server until we’ve gone through a few more steps.
Saving and Exiting your Dedicated Palworld Server
In order to save your world when you close it, there’s a few commands that you need to run.
- What you need to do is type in /AdminPassword followed by the admin password you set up in the previous steps.
- Now you can run the commands
/Save to save all your progress.
/Shutdown
/Shutdown {Seconds} {MessageText} (This give people a warning message and a timeframe)
Below is a full list of the commands available for your server.
| COMMAND | ACTION |
| /DoExit | Force stop the server. |
| /Broadcast {MessageText} | Send message to all player in the server. |
| /KickPlayer {SteamID} | Kick player from the server. |
| /BanPlayer {SteamID} | BAN player from the server. |
| /TeleportToPlayer {SteamID} | Teleport to current location of target player. |
| /TeleportToMe {SteamID} | Target player teleport to your current location |
| /ShowPlayers | Show information on all connected players. |
| /Info | Show server information. |
| /Save | Save the world data. |
Note: You can find a full list of Palworld Dedicated Server Commands here
How to get Other Players to join your Palworld Dedicated Server
To let someone on the same local network as you play in your Palworld Server: You need to allow the ASA server through your firewall.
So you will need to open the following ports:
8211
27015
27016
25575 (if you’re using RCON).
Note: If you set a custom port above, then forward that as well.
IMPORTANT: If you’re using a third-party antivirus with a firewall make sure you forward or white list ports there as well.
If you’re using Windows Defender Firewall, then run the following commands in an Administrator Powershell window. You can open Powershell by searching Powershell from the Start menu then right-clicking on it and selecting Run as administrator.
New-NetFirewallRule -DisplayName "Palworld Server" -Direction Inbound -LocalPort 27015,27016,25575 -Protocol TCP -Action Allow
New-NetFirewallRule -DisplayName "Palworld Server" -Direction Outbound -LocalPort 27015,27016,25575 -Protocol TCP -Action Allow
New-NetFirewallRule -DisplayName "Palworld Server" -Direction Outbound -LocalPort 8211,27015,27016,25575 -Protocol UDP -Action Allow
New-NetFirewallRule -DisplayName "Palworld Server" -Direction Inbound -LocalPort 8211,27015,27016,25575 -Protocol UDP -Action Allow
This will open all of the ports and allow people on the same local network as you to connect to your server while it’s running.
All you need is your local IP address.
How to Find Your Local IP Address
-
Run the following in a terminal/CMD/PowerShell window: ipconfig
-
Find your Internet connection: Ethernet adapter, WiFi, etc.
-
Find the IPv4 address and copy it
-
For example, your local IP is 192.168.1.11
Other devices can use this local IP address to connect to your server.
IMPORTANT: This is a LOCAL IP, and your server is not yet accessible online (the internet) or even routers outside of your own. So you will need to use Port Forwarding to finish the setup process.
How to Set Up Port Forwarding for your Palworld Dedicated Server.
Using your Local IP address, and allowed ports through to - It's time to forward traffic from these two ports.
-
Check your Local IP address:
Find your local IP address, and ensure that the necessary ports (7777, 7778 for UDP, and 27015 for TCP) are allowed through to your computer. -
Multiple Routers:
If you have multiple routers in a chain, port forward each router to the next until you reach your computer. You'll need to port forward ports 7777, 7778 (UDP), and 27015 (TCP). Look up specific guides for your router. -
Single Router Scenario (Directly connected to the Internet):
- Forward the following ports: 8211, 27015, 27016, 25575.
- Type: TCP/UDP.
- Destination: Your computer's local IP address (e.g., 192.168.1.11).
-
Port Forwarding Process:
- Forward ports 7777 and 7778 for UDP.
- Forward port 27015 for TCP.
- If your router allows, choose both TCP and UDP.
- Some routers may allow entering ports comma-separated (e.g., 8211,27015,27016,25575) or selecting TCP/UDP together.
Letting others join
You've opened up your Palworld server for both local and internet connections.
- To let others join, either check the in-game Server Browser or find your external IP address by Googling "What is my IP." Share the IP with people you want to joint the game.
- They can connect using the console command: open xxx.xxx.xxx.xxx:8211.
How to set up Your Own Palworld Dedicated Server.
That's the entire process for hosting and creating a palworld dedicated community server. It's not the most simple process for creating a game server however it's about as simple as we can make the process. Anyway, hopefully, that has explained how to set up a dedicated server for multiplayer in Palword. This will work for both Steam and Game Pass however the Steam version is more user-friendly.