Table of Contents
If you are using Windows 10 and would like to disable the indexing of content from Network locations when using the Photos app. This article will show you how to enabled or disable Network indexing within the Photos app, speeding up loading times for local files.
How to remove ‘Move to OneDrive’ From the context menu (right-click menu) on Windows 10.
Windows 10 and all the preinstalled apps that come with it, quite often get features and updates that improve the quality of life functions we all use every day. Unfortunately, a lot of the time these features and updates don’t get much exposure, leaving them to lay dormant until we stumble across them in our search for change.
The Windows 10 Photos app is a classic example of this, with it quite often gaining features that stay unnoticed for months at a time. Which is a shame because the Photos app on Windows 10 is by far the most useful preinstalled app on the operating system. Starting version 2020.20070.30003.0 the Photos app on Windows 10 will gain a feature that allows you to disable all Network Indexing. With Network Indexing disabled, the Photos app will stop waste resources searching for content store in other locations.
Related: How to blur messages in WhatsApp until you hover over them. (on-screen privacy for WhatsApp)
How do you stop the Windows 10 Photos app from indexing content from Network locations?
Before you can take advantage of this feature, you’ll need to make sure you have the latest version of Windows 10. Once you have this, you can open the Photos app, then click the three dots in the top right-hand corner of the screen and select Settings from the drop-down menu.
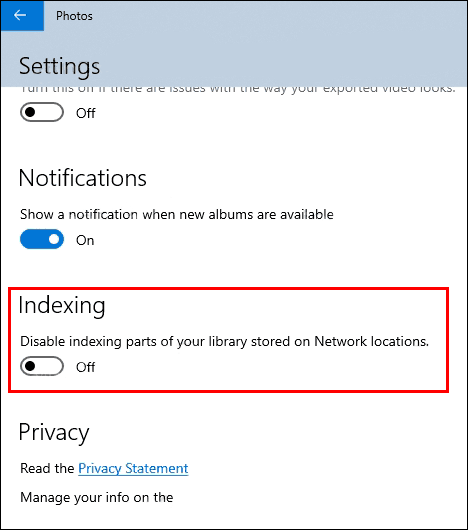
From the long list of options that appears on the screen scroll down until you see the newly added option under the heading called Indexing, called: Disable indexing parts of your library stored on Network locations. When you find the option, simply flip the toggle to off and you’ll the Photos app will finally stop Indexing Network locations as well as local ones.
Alternatively, if you don’t mind a slower process for fetching and sorting photos to have full Network Indexing, you can flip the toggle On. Keep in mind that your network speed and system spec will determine how fast this process is. I recommend for older machines running on WIFI to keep Network Indexing off. At the end of the day however, it really depends on the amount of data that is being indexed.
From time to time it’s a good idea to explore some of Windows 10’s preinstalled apps and tools because new things fly under the radar quite often. Even OneDrive and Outlook often get features that can easily be missed.
On a side note...
If you are also keen to try some brand new Chrome features, make sure you check out the following article which will guide you through the process of enabling Tab Groups. A brand new feature of Chrome that isn’t enabled by default but allows you to better manage Chrome tabs you have open.