Table of Contents
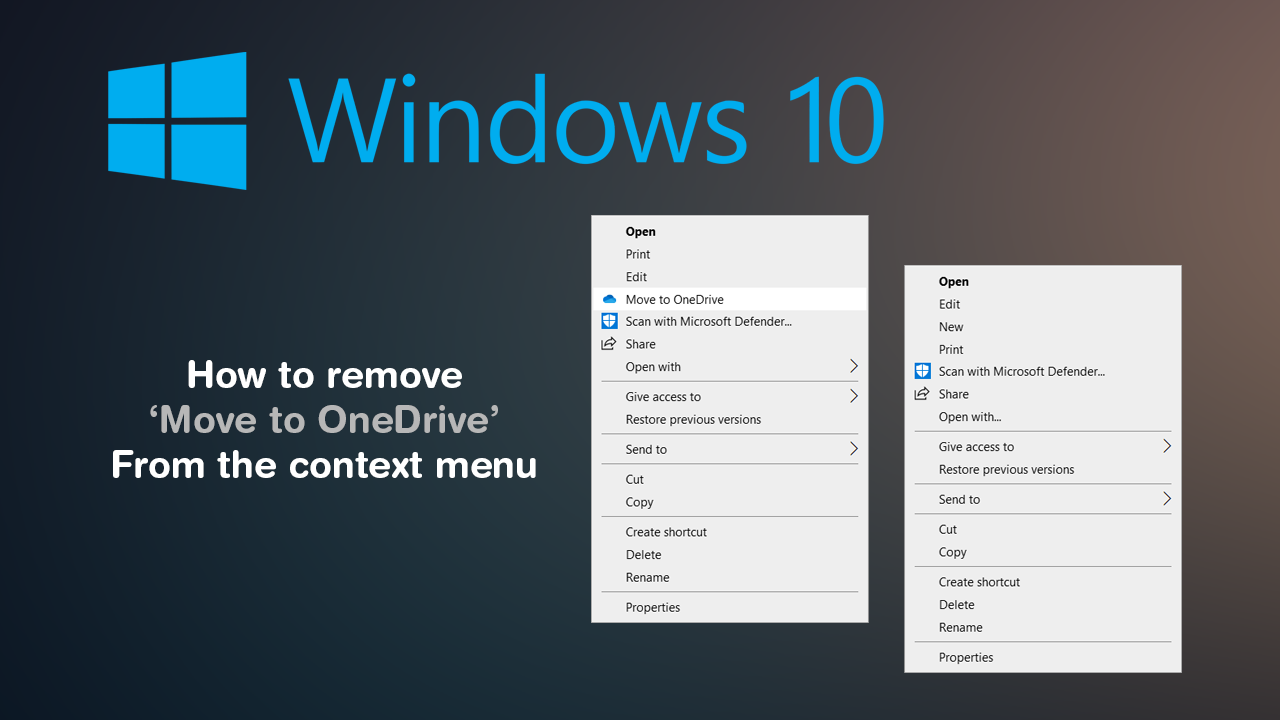
Learn how to remove the ‘Move to OneDrive’ context menu entry (right-click menu) on Windows 10. A small yet potentially annoying context menu you may find yourself click by mistake from time to time.
How to blur messages in WhatsApp until you hover over them. (on-screen privacy for WhatsApp)
On Windows 10 there are two very useful tools that allow you to make backups of your precious data, OneDrive and File History. However, depending on how you use your system will determine how useful each of these tools is. While File History is preferred for bigger and long term backups, OneDrive is more useful for quick, easy to get to file storage on the go.
The only real issue with OneDrive is the fact that Mircosoft always seems to put icons and shortcuts in way too many places. Some of which aren’t even useful. Thankfully in the case of the OneDrive ‘Move to OneDrive’ context menu entry, it can be removed, without much effort. Though it will require you to make some changes in the Windows 10 registry.
As this process requires some changes within the Windows Registry Editor, it’s important to make sure you have a System Restore Point to revert back to if something goes wrong. If you haven’t created a restore point before, open the start menu, type Restore, then select Create a Restore Point when it appears on the list.
In the new window that appears on the screen, click Create in the bottom right corner of the screen, then follow the on-screen instructions.
Related: How to find saved VPN password on Windows 10. (Recover VPN passwords on Windows 10)
How do you remove the ‘Move to OneDrive’ icon from the Windows 10 right-click menu?
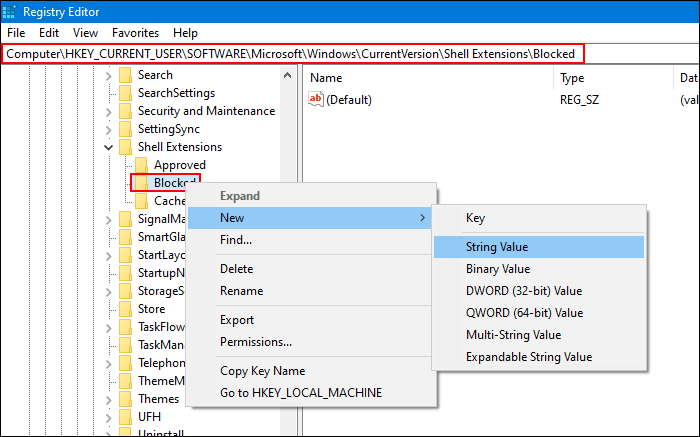
Now that you have a safe restoration point, you can continue with the process. To begin, open the Run tool by pressing Windows Key + R, then type regedit into the text box and press Enter.
Now navigate to the following location using the left-hand panel:
HKEY_CURRENT_USER\Software\Microsoft\Windows\CurrentVersion\Shell Extensions\
Once you are in the correct location right-click the Shell Extensions folder (key) and select New > Key and name it Blocked.
Next, right-click the Blocked folder (key) select New > String Value and name it
{CB3D0F55-BC2C-4C1A-85ED-23ED75B5106B}
That’s it, the process is complete, you can now close the Registry Editor, and the Move to OneDrive context menu entry will be gone.
On a side note…
If you are also looking for a quick and easy way to add a little more information to the text box that Windows 10 shows when deleting files. Make sure you check out the following article which will show you how to double the amount of information displayed before you confirm file deletions on Windows 10.
How to View Full Details in the Delete File Confirmation Dialog Box on Windows 10.
Other context menu customization articles.
If you are looking to make some more context menu changes, make sure you check out some of the other guides listed below.
How to Add Control Panel to the Windows 10 Context Menu.
How to Remove ‘Share’ From the Windows 10 Context Menu.
How to Disable the Start Menu Context Menu on Windows 10.
How to Customize the ‘Send to’ Context Menu on Windows 10.
How to Restore Command Prompt to the Windows 10 Context Menu.
How to Remove ‘Give Access to’ From the Windows 10 Context Menu.