Table of Contents
If you have a Windows 10 PC and have been dying to uninstall WordPad. Follow along as this article guides you through several different methods you can use to remove WordPad from your PC. A relatively useless program/app preinstalled on Windows 10.
How to Get Dark Mode For WhatsApp on Windows 10. (WhatsApp Dark Mode Windows Client)
Windows 10 has undergone a lot of changes since it was first released back in 2014 and while most of them have been decent, it has taken until now for WordPad to finally become a removable program/app. Although most people probably don’t really notice WordPad on their system, it does occasionally get in the way when Microsoft Word is also installed.
If you’ve been waiting for this day for as long as I have, follow along as we guide you through all of the current known ways to remove WordPad from Windows 10. And if you need it reinstalled, how to reinstall WordPad on your Windows 10 computer.
How Do You Uninstall WordPad On Windows 10?
The first thing to note about removing WordPad from Windows 10 is the build number of your system. You need to be on Windows 10 Build 18963 or newer. If you aren’t, you won’t be able to perform any of the following removal steps successfully. If you aren’t sure how to check your build number right-click the start menu icon, then click System. This will bring up a new window listing all your Windows specifications including your Build Number
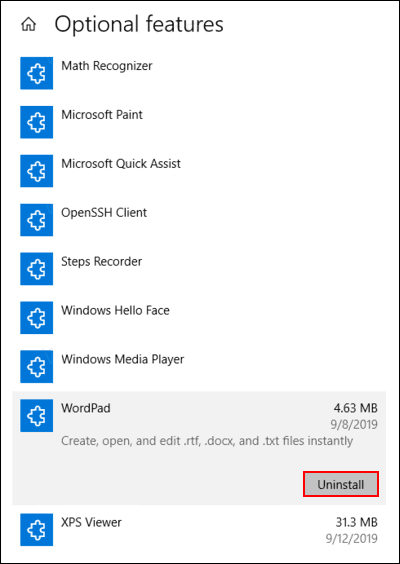
Uninstall WordPad On Windows 10 From Settings.
To remove WordPad using Settings, open Settings, navigate to Apps > Apps & Features. Click on Optional Features in the centre, then on the next page click WordPad. Finally, click Uninstall and simply wait for the process to complete and you will be WordPad free!

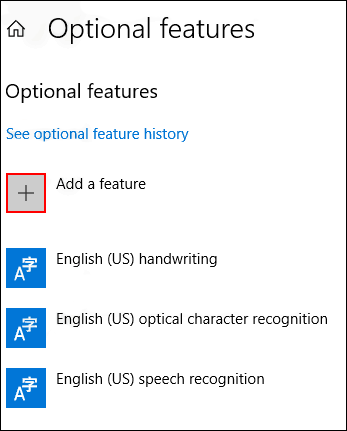
Reinstall WordPad On Windows 10.
To reinstall WordPad using Settings, open Settings, navigate to Apps > Apps & Features and click the Optional Features link in the centre, then click Add a Feature, find and mark the checkbox next to it, and click Install. Windows will now reinstall WordPad on your computer.
Install/Uninstall WordPad On Windows 10 Using DISM.
If you would rather install or uninstall Wordpad using Command Prompt and DISM you can also do so. To do this open Command Prompt (as Admin), then copy and paste the command that suits your needs into Command Prompt and press Enter.
Uninstall WordPad:
dism /Online /Remove-Capability /CapabilityName:Microsoft.Windows.WordPad~~~~0.0.1.0.
Reinstall WordPad:
dism /Online /Add-Capability /CapabilityName:Microsoft.Windows.WordPad~~~~0.0.1.0.
Once the command finishes, you’ll have either installed or uninstalled WordPad on Windows 10.
On a Side Note…
If you are also having some issues with the calculator app on Windows 10 not opening or crashing during use, make sure you check out the following guide which will show you several different steps you can to take resolve the issue
How to Fix Calculator Not Working On Windows 10. (Windows 10 Calculator Broken)