Table of Contents
If you use Google Chrome for you all Internet browsing needs but are sick and tired of it using a hell of a lot of memory (ram), this article will show you how to enable Tab Freezing. With Tab Freezing enabled, Chrome will prevent all background tabs from performing any tasks or refreshing. Saving system resources and battery.
How to Fix a USB Port That Remains Active After Using Safely Remove Hardware.
Google Chrome is a decent all-round use case browser that’s easy to use, stable, and allows for syncing across multiple devices. It’s also the most popular Internet browser on the market, with a very vocal user base. All of which love to bring up Chromes bad habit of consuming system resources, in particular memory…. In response to this noisy and very valid claim, Google has released a brand new feature aimed at reducing Chrome’s hunger for ram.
The feature is called Tab Freezing and differs considerably from Tab Discarding, as it freezes (stops) all activity from background tabs. The new tab freezing feature in Chrome automatically freezes open tabs that are inactive for 5 minutes. In contrast, Tab Discarding automatically discards most inactive tabs (not all) when Chrome detects that the system memory is running low. However, it will only disable enough tabs to free up essential resources. Seeing as this feature isn’t enabled by default, follow along closely as we guide you through the steps to enable it. It’s important to note that at this stage, the feature is only available for Google Chrome Canary but will be rolling out to the standard version of Chrome soon enough.
Related: How to Sort Your Instagram Feed By Date, Likes or Comments.
How Do You Enable Tab Freeze in Google Chrome to Reduce Memory Usage and Increase Battery Life?
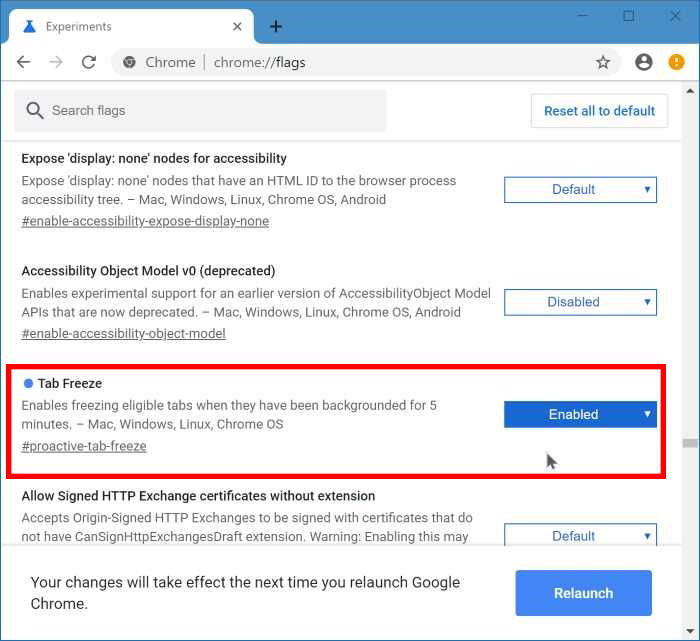
To begin, the first thing you are going to need to do is update Google Chrome to the latest version. Once you have done this, Tab Freezing will become available to you. With an updated version of Chrome, open the browser, then type chrome://flags into the address bar and press Enter.
Now use the Search box at the top of the page to search Tab Freeze. When the option appears simply use the dropdown box next to the entry to select Enabled. For the final step, Restart Google Chrome, and the change will take effect. Although 5 minutes isn’t the most practical time frame for a lot of users, Google may decide to add custom time frames from instantly to 1-minute intervals. If at any stage you wish to revert your Tab Freezing settings back to default, simply return to the exact same location and flip the drop-down box back to Default or Disabled. Just don’t forget to Restart the browser before continuing or the change won’t take effect.
One a Side Note…
While you are here learning a little more about Google Chrome, make sure you check out the following two Google Chrome related articles which will show you how to enable Password Leak Detection, an overdue security feature. And how to turn off Tag Previews, a feature that most people probably won’t enjoy having enabled.
How to Enable Password Leak Detection on Google Chrome.
How to Disable Tab Previews (Tab Hover Cards) in Google Chrome.