If you are trying to create content in Premiere Pro but are having major issues with the yellow Media Pending error message. This article will guide you through quite a few different options you can use to solve the problem. Thankfully, this is one of the easier Premiere Pro errors to deal with.

Takeaways:
- Learn how to fix the Yellow Media Pending Error in Premiere Pro.
- What causes Media Pending errors in Premiere Pro?
Table of Contents
How to Fix Media Pending Error in Premiere Pro.
In order to solve this timeline problem while video editing in Premiere Pro, you'll need to work your way through the steps shown below. We've listed them in order of effectiveness and ease so it's best to start with 1 and work your way through to 8
1. Restart Premiere & your Computer.
I know you've probably tried it already but I really do have to add it to the list. Make sure you have restarted your computer and Premiere Pro. You'd be surprised how often this will solve the problem. If it doesn't try the next step.
2. Disable & Re-Enable Clips
This is the quickest and easiest fix that should work for 90% of people.
-
Select all your clips in the sequence by pressing Ctrl/Command + A.
-
Now right-click a selected clip, and click Enable (to disable).
-
Repeat step two, right-click, and select Enable (to re-enable).
Most of the time this should fix the problem. If it doesn't you've got 8 other potential fixes waiting.
3. Make an Adjustment to the Clip/s.
For whatever strange reasons making a tiny change or adjustment to the clip can pull it out of the abyss. So first select the Razor Tool (shortcut: “C“) and then cut the problem clip once. The second thing you can try is to trim one frame at the start or end of the clip. Also, try to extend the clip by one frame if possible. You can usually undo the change as soon as you've made it and the the file will come back.
4. Copy Everything to a New Sequence
If making an adjustment to the clip doesn't solve the problem, you can try moving everything to a new sequence.
-
Right-click the sequence in the Media Browser, and select New Sequence From Clip. This will give you all the correct settings.
-
Now remove the clip located in the new sequence.
-
Next, select all clips in the original sequence, right-click, and select Copy.
-
Open the new sequence, and paste everything in.
Note: You will have to re-adjust the audio levels.
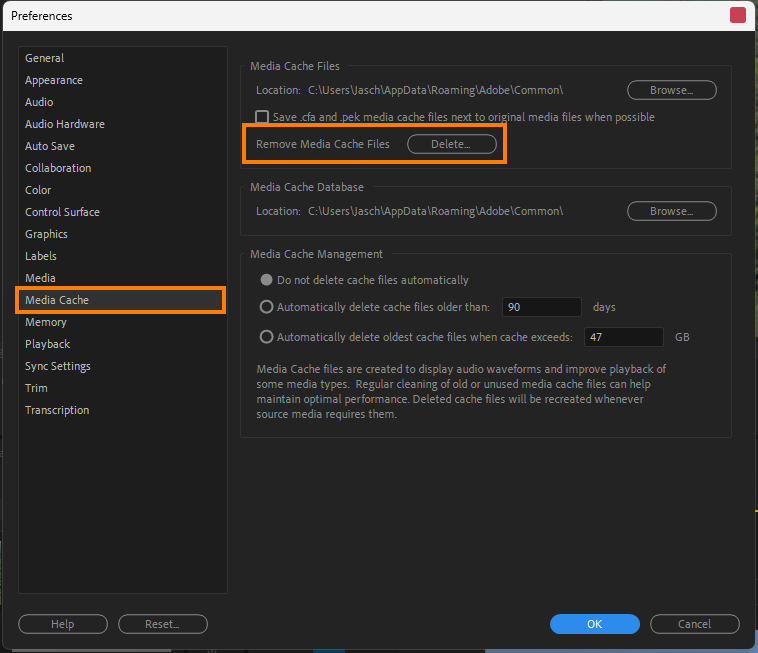
5. Delete Media Cache
Delete the Medica Cache and the project will recache everything without the corruption or whatever was causing the problem.
- Restart Premiere Pro and do not open any new projects.
- Next, click on Edit > Preferences > Media Cache, and click on Delete under Media Cache Files. You’ll see two options; choose the last one.
- Since you are getting the error on a project you are working on; the media cache is not “unused.” so choose Delete all media cache, then click Ok and Premiere Pro will restart.
6. Delete Video Preview Files
You can skip this step if you didn't use the render sequence feature.
- To delete your video previews, click on Sequence > Delete Render Files and create new problem-free ones.
7. Change Location You have your Files. Slow Drives Can Cause this Issue.
Move all of the media you are working with to a single local drive on your device. Not an external device. This should speed things up and solve the problem.
- Copy all the files and footage on the external drive and paste them into a folder on your computer. Make sure it is an SSD.
- This will break the connection in Premiere Pro so expect to see the Media missing/offline error.
-
Now select all the clips in the Media Browser inside Premiere then right-click one of the clips and select Link Media.
-
Update the path to the new location that you have moved all of the files to.
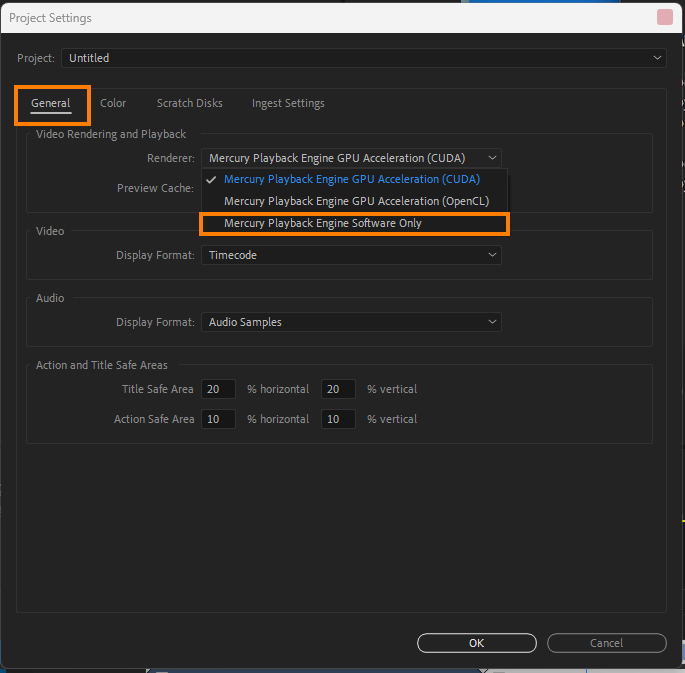
8. Use Software Encoding Instead of Hardware Encoding.
You can try switching from Hardware Encoding (fast) to Software Encoding (slow). This isn't really a solution but it might help solve the problem for this particular project.
-
Click on File > Project Settings > General.
-
Set Renderer to Mercury Playback Engine Software Only.
-
Click on OK.
What Is A “Media Pending” Error?
The yellow Media Pending error in Premiere Pro is generally caused by a minor corruption or a linking issue where Premiere can't find the exact location of a file or multiple files. Sometimes it will only happen for a specific file but it can sometimes happen to all files in a project. The good news is that it's fairly easy to fix.