Table of Contents
If you have been using OneDrive for a considerable amount of time, there’s a good chance you’ve made use of the Backup tab. Recently, however, this tab has vanished on some users systems, causing quite a lot of confusion about the features of the tab and whether it has been officially removed by Microsoft.
How to Fix Windows 10 Not Updating to Version 1909. (Can’t Update Windows 10 to Version 1909)
OneDrive is generally one of the best and most reliable cloud services on the Internet, rarely suffering downtime or problems with the service. It’s also easy to use, comes preinstalled on Windows 10 and has 5gb of free storage space which can be used as you please. Recently, however, OneDrive has acquired a strange little bug that sometimes causes the Backup tab to completely vanish from settings within the client.
Thankfully this isn’t the end of the world as the Backup tab can usually be restored without a full uninstallation and reinstallation of OneDrive. The solution isn’t the most simple of fixes, but it is a much more time-efficient option to a complete reinstall. Before you start the process below its a good idea to make sure you have a restore point set. Just in case something goes wrong or you make a mistake.
Related: How to Use More Than One WhatsApp Account At the Same Time on Windows 10, MacOS, and Linux.
How Do You Fix the Backup Tab Missing From OneDrive? Fix Missing Backup Tab in OneDrive on Windows 10.
If you haven’t made a system restore point before, you’ll need to do the following. Open the start menu, type Restore, then select Create a Restore Point when it appears on the list. From the new window that appears, click Create in the bottom right section of the screen, then follow the instructions given by Windows. Once you have successfully made a restore point, you can continue with the steps shown below.
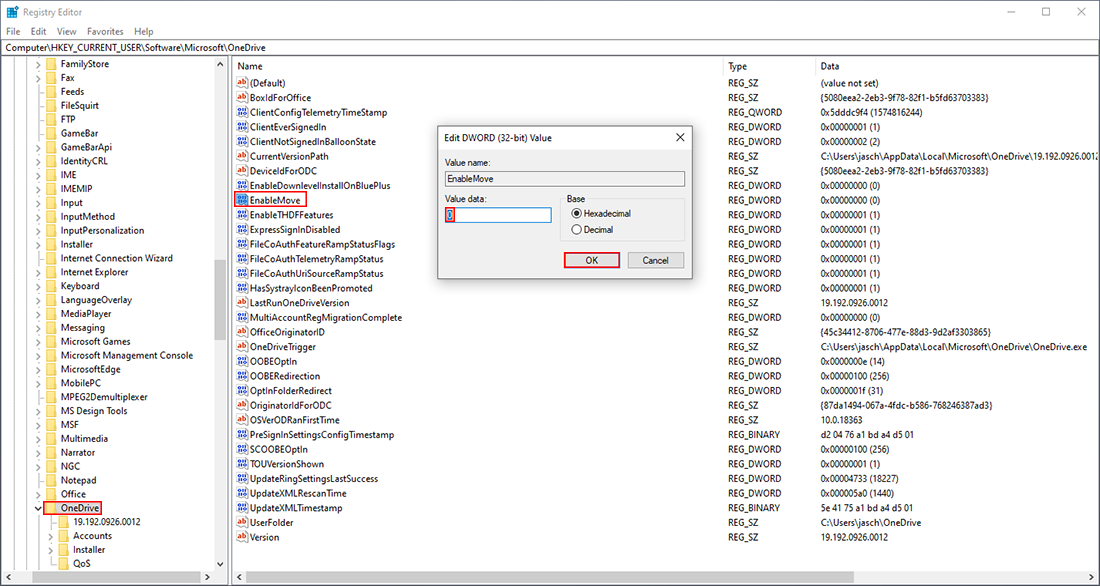
With a restore point set, open the Windows Run tool by pressing Windows Key + R, type regedit into the box, then press Enter. Once you have the registry editor open, navigate to the following location:
Computer\HKEY_CURRENT_USER\Software\Microsoft\OneDrive
When you are in the correct location right-click on the OneDrive entry and select New > DWORD (32bit) Value. Now make sure you name this new entry EnableMove.
Next double-click EnableMove and make sure its Value Data is set to 0. After double-checking this, you can Restart your computer or log out then back in and the change should take effect. If after a restart, the Backup tab still hasn’t returned, you’ll, unfortunately, have to completely uninstall and reinstall OneDrive to resolve the issue.
On a Side Note…
While you are reconfiguring your OneDrive settings to fix the missing Backup tab, make sure you also check out the following article which will guide you through the process of making File History on Windows 10 include your OneDrive folder. A super handy way to make sure you have a complete backup system in place should something ever go wrong.
How to Make File History Include Your OneDrive Folder on Windows 10.