Table of Contents
If you have a massive YouTube history that doesn’t really serve a purpose outside of being a gigantic list. This article will show you how to get your YouTube history under control and into a more manageable history time frame.
How to Enable or Disable Exploit Protection For Apps and Programs on Windows 10.
In previous guides, we’ve shown you how to set up automatic deletion periods for certain data and histories stored in/on a variety of different services and apps. Services such as Facebook and Google are the first two that come to mind. Although the main reason to periodically remove data from these kinds of services is generally to reduce the amount of data collection occurring, you may also wish to keep a relatively easy to search history on your accounts/apps.
As YouTube is one of Google biggest services, it’s no surprise automatic history deletion has made it over to the service. If you’re someone who watches a ton of YouTube you’ll more than likely have a massive, almost unmanageable history, so follow along as this article shows you how to configure YouTube’s automatic data deletion settings.
Related: How to Record With Both (Front & Back) Cameras at the Same Time on Android.
How Do You Set YouTube to Automatically Delete Your History?
To set up YouTube to automatically delete your history after three or eighteen months, you’ll first need to sign in to your account, then head on over to the My Activity section of your Google Account. Here you will be able to view and adjust your history settings. Alternatively, you can access this location directly using the link below.
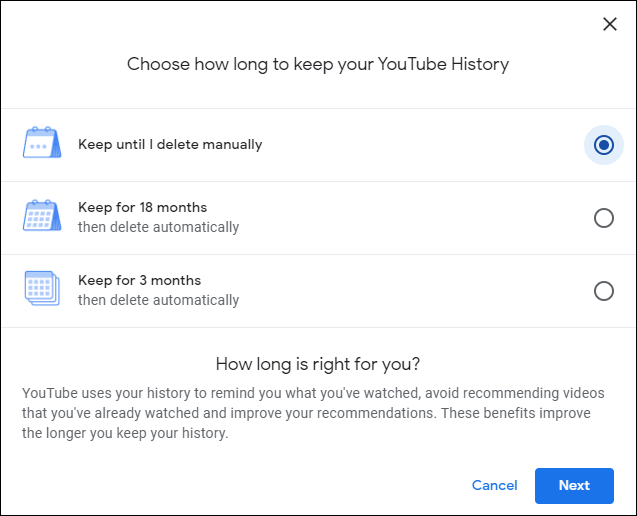
On this page, you will see two main options, one to change your YouTube History Status and another to activate Auto-delete history. By default, until now, YouTube history has always been saved until you delete it manually, which is why finding anything in your history can be such a pain in the ass. With this new option, you’ll be able to change this to 3 months, which is far more practical.
To configure automatic deletion click Choose to delete automatically, then select from the two time lengths. Once you have chosen, simply confirm the change and YouTube will start following your new settings. During this process, you will also be asked if you wish to remove your current history now or when the automatic deletion takes place. Personally I would suggest now, however, take some time to think about it as you can’t go back once it has been done.
Alternatively: You can turn history off completely should you not wish to save one.
On a Side Note…
If you also happen to be in the process of adding dark themes to your operating systems, apps, websites, and of course programs. You may wish to check out the following article which will show you how to get a dark theme for the WhatsApp Windows 10 client. Although the theme is a third-party one, it does an exceptional job of changing the notoriously white app to a more eye-friendly one.
How to Get Dark Mode For WhatsApp on Windows 10. (WhatsApp Dark Mode Windows Client)