If you are trying to encode/render a project in Adobe Premiere Pro but keep getting Unable to Render - Accelerated Renderer Error. This article will show you a couple of different troubleshooting steps you can try that will fix the problem and allow you to render projects in Adobe Premiere without Unable to render error.
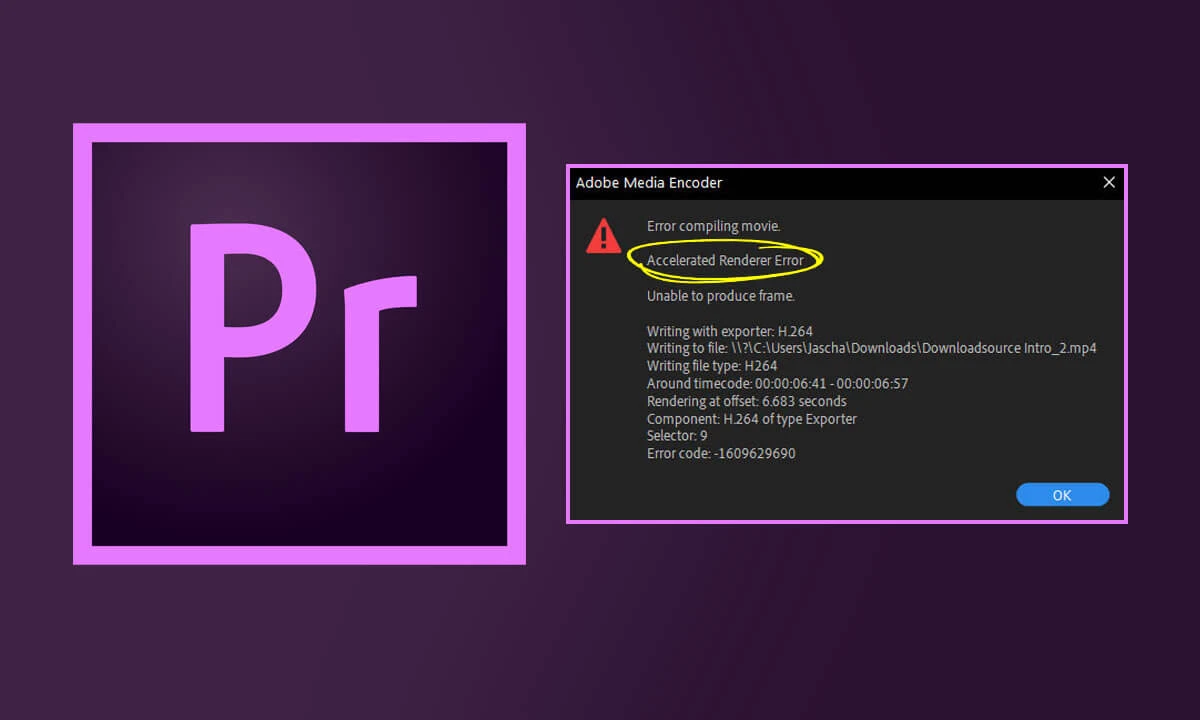
Table of Contents
Related: How to fix the text tool not working in Photoshop.
Adobe Premiere Pro can be quite a mind-blogging program to get your head around if you are just starting out with video editing. It’s also a very resource-intensive program to use on laptops and older machines as it uses a lot of CPU and GPU power to process video footage and the assets and graphics you add to projects. That said, there aren’t many other programs out there that offer the features that Premiere Pro does.
I’ve recently been using Premiere Pro to edit and create content from 360 camera footage and noticed that it continually gets Unable to Render - Accelerated Renderer Errors shortly after starting the encoding/rendering phase of an export. Thankfully, there is a really easy way to fix Unable to Render - Accelerated Renderer Error in Adobe Premiere Pro and a few of the other similar errors that occur during export. But before we start, it’s important to understand what is causing this error.
Ninety-nine times out of one hundred Unable to Render - Accelerated Renderer Error in Adobe Premiere Pro is caused by a graphics card overload, though some errors can also be linked to CPU usage. As a result, Premiere Pro will cancel the process and drop an error message. The good news is that this can easily be fixed by switching from hardware encoding/rendering to software encoding/rendering.
There is one major downside to this though…. Speed! Software rendering takes a hell of a lot longer to do, for example, I recently exported a video for YouTube (check it out here) that was 2 minutes and 22 seconds long. Normally it would take about 3 minutes to render in Premiere Pro using hardware rendering, however, I had to switch to software rendering because of the animations I used. This brought my rendering time up to 33 minutes. So if you are working with 4k footage or something with a lot of graphical content and assets you’re going to be waiting for a long time.
How do you fix Unable to Render - Accelerated Renderer Error in Premiere Pro?
To fix this issue you have two different options, the first and least practical is to save your project and move it to a more powerful PC. I do this quite often, for example, I create content on my laptop and render it on my desktop PC. This isn’t ideal as you need two devices, one that is usually far more expensive. However, it is a viable solution if you already have the hardware.
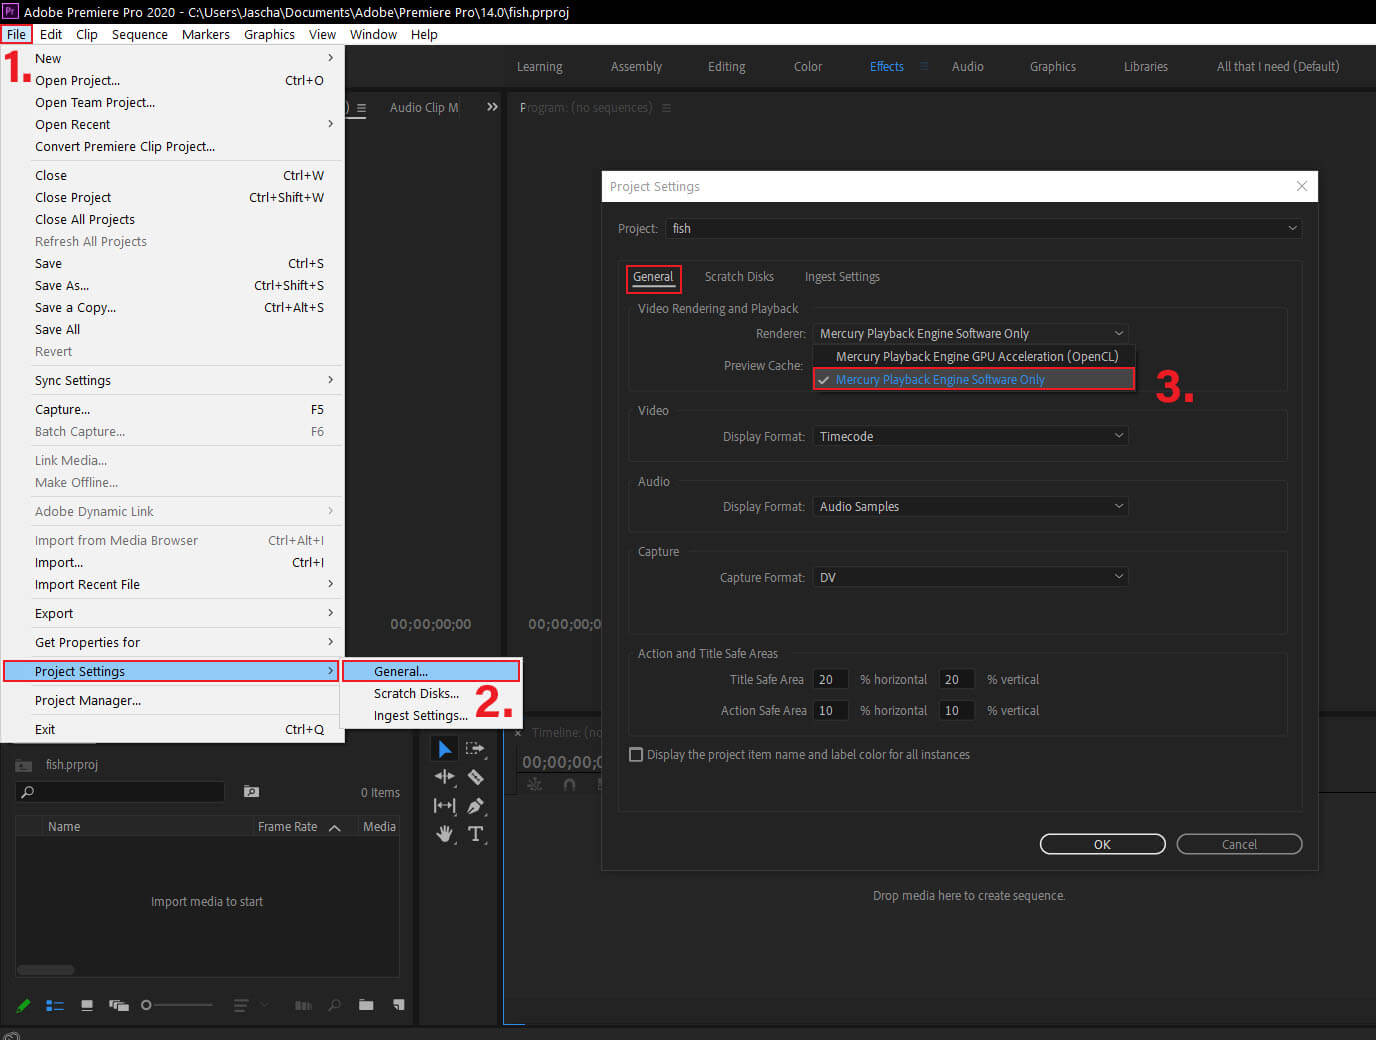
The second fix is to switch from hardware rendering to software rendering. As Premiere Pro defaults to hardware rendering you’ll need to do the following to switch it. First, open a project in Premiere Pro, then do the following.
- With a project open, go to File > Project Settings > General.
- In the new window that appears stay on the General tab and change the option to Mercury Playback Engine Software Only. The other option you have may look different depending on your system’s hardware. Just make sure you pick the Software only option. Finally, click Ok.
After making this change, your project will render without any issues, however, it will take way longer to complete. Unfortunately, there isn’t much else you can do about this unless you want to pay for a render farm to render the project for you, though this probably isn’t economically viable for 90% of people.
Alternatively, you could go to the time marker in the error message and replace the graphics or asset with something less graphically intense. This has saved me a few times but it is disappointing to change part of your project that you worked so hard to get perfect.