If you are using Premiere Pro and you notice that playback is often slow or sluggish, even when you reduce playback to half, a quarter or even less, you may need to change where your Premiere Pro cache is located. This will only apply to users who have more than one drive in their PC. If you are using a laptop with a single drive and no external drive attached you won’t gain any benefit following the steps shown here.

Table of Contents
Related: How to fix Premiere Pro blank screen when pausing playback.
Premiere Pro is one of the most popular video editing tools on the market and is well known for its steep learning curve and ability to throw bugs and glitches into any workspace. I’ve been using Premiere Pro for a couple of months now and have to agree with the current assessment of the program! It’s awesome when it’s working and horrendous when it’s being temperamental.
Unsurprisingly a lot of Premiere Pros’ issues stem from the hardware you are using it on, for instance, I encounter fewer issues when working from my gaming PC over my laptop, however, this doesn’t eliminate everything and in most cases just changes the kind of issues I encounter. Which brings me to the topic of today’s guide changing the cache location in Premiere Pro.
How do you change the cache location in Premiere Pro? Change the Premiere Pro cache from your HHD to your SSD.
By Default Premiere Pro will use the drive you installed it on as its main cache source which is fine most of the time, however, if you have more than one drive available say an NVME, SSD, or HDD, you may wish to switch the drive your cache and scratch disks are located. This can help playback performance and the overall responsiveness of Premiere Pro on your machine.
Before you start the steps shown below, it’s also a good idea to make sure that you have Premiere Pro installed on the fastest drive installed in your device. Just like gaming Premiere Pro is a resource-hungry program and will use everything you through at it! Especially CPU and RAM.
- To change the cache location in Premiere Pro launch it, then open a new or existing project.
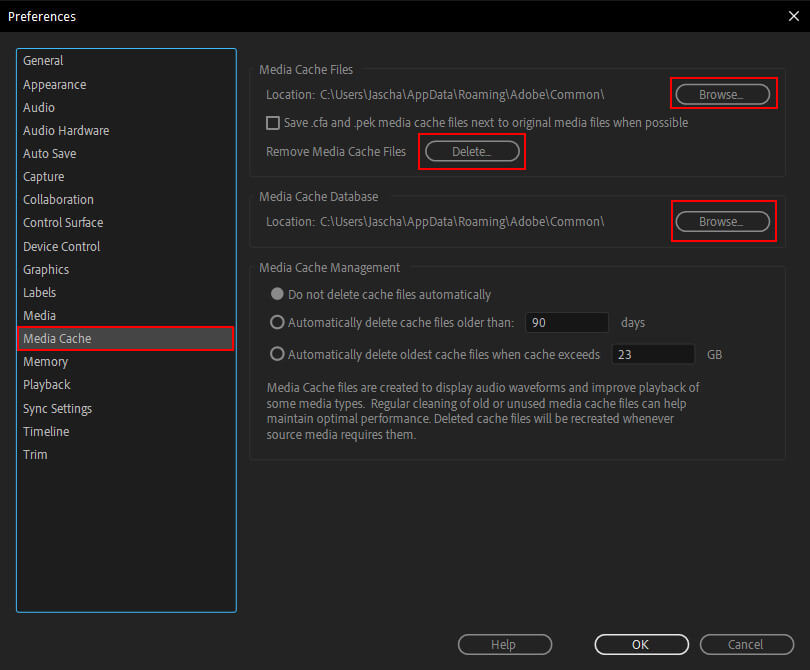
- Next, click Edit along the top of the screen then select Preferences.
- Here change to the Media Cache tab about halfway down the left-hand menu.
- Before you switch to a new cache location it’s a good idea to clear the current one. So click Delete next to remove Media Cache Files.
- Now on the Media Cache page, use the Browse option in the top right-hand corner to change the caching location for Premiere Pro. By default, it will be the same installation folder as Premiere, but you can change it to anything you want. Repeat the process for Media Cache Database as well. Personally, I would change it to the fastest drive on your computer but it’s up to you.
After you have made this change, Restart Premiere and the change will take effect. While you’re here, make sure you check out these other guides, because you’re going to need them at some stage, Premiere Pro can be quite problematic at times.
How to fix Premiere Pro blank screen when pausing playback.
How to add templates like lower thirds & call-outs to Premiere Pro.
How to fix Premiere Pro Unable to Render. (Accelerated Renderer Error fix)
How to fix Premiere Pro MSVCP110.dll, MSVCR110.dll, MSVCR100.dll was not found.