If you are using Premiere Pro to create content but are having some major issues with exports getting stuck at 100% or any other percentage. This article will show you how to fix the problem and get Premiere Pro to export again and not get stuck or freeze at random percentages.

Table of Contents
Related: How to fix There Was an error decompressing Audio or Video in Premiere Pro.
Premiere Pro is a fantastic video editing and content creation tool, however, it does take a lot of time to understand fully and master. It’s also a brilliant, yet buggy piece of software that is amazing while it’s working and an absolute nightmare when it isn’t. I’ve personally spent days creating content only for Premiere Pro to refuse to export it for a range of different reasons. The most recent issue being exports getting stuck at 100% or on rarer occasions, getting stuck at other percentages.
While this issue is probably already pushing you over the edge there is a simple fix that will solve the problem instantly. But for whatever reason Adobe hasn’t included an error message that explains the cause to help people understand what’s going on. I spent hours messing around with SLI configurations and other hardware changes only to find out the problem is entirely different.
Tip: Try to keep all your project files in a single location (folder/drive) this helps speed up the export process dramatically. Also, try to work from an SSD. HDDs are a disaster when working in Premiere Pro.
How do stop exports in Premiere Pro from getting stuck at 100% or getting stuck at other random percentages?
To put it simply, this issue is entirely cache and space related. Which means probably means you are going to have to make a few changes.
- First, make sure that the drive you have Premiere Pro and the default cache on has at least 20GB of free space. Yes, that’s right, 20GB seems to be the most stable amount of free space to use. 15GB is ok but 20GB seems to prevent any issues.
Now clear the Media Cache folder to fix exports freezing or getting stuck at 100% in Premiere Pro.
Next clear the Media Cache. This will remove any old junk files and potentially corrupted data. To clear the Premiere Pro cache do the following.
- First, open Adobe Premiere Pro.
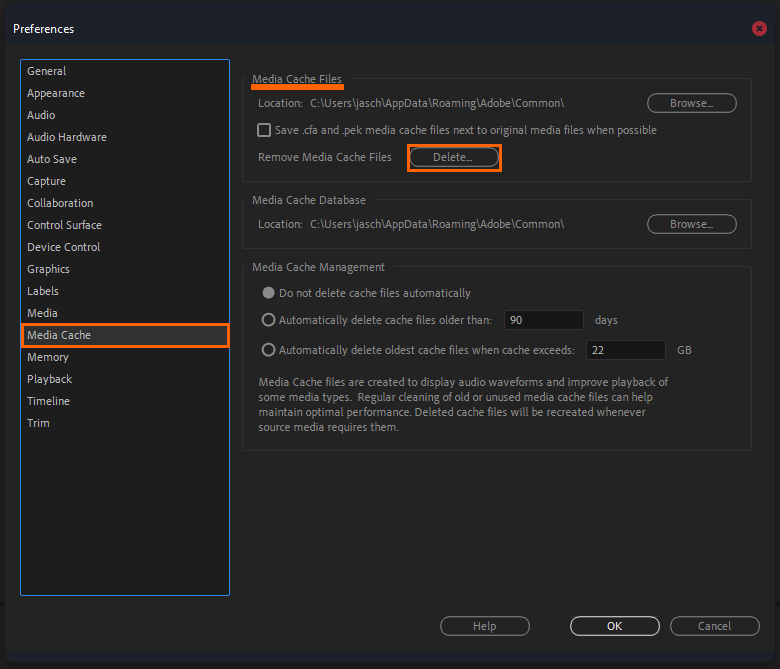
- Then click Edit >Preferences > Media Cache.
- Here click Delete under the Media Cache Files section.
- Now accept clearing everything and restart your computer and you shouldn’t have any issues with exporting/encoding anymore.
If you don’t have a lot of spare space on your primary drive you can move the cache to a different location by clicking Browse and selecting a new location. However, you will want to clear the old cache folder first.
As we mentioned above, it’s also a really good idea to keep all the files and content for projects on a single drive (SSD). This saves Premiere Pro from having to drag content and data from all over your computer. Different drives with different write speeds and other variables can slow down or complicate the process. While Premiere Pro can deal with this, it’s just a good workflow and housekeeping habit to get into.
While you’re here I also suggest bookmarking some of our other very popular Premiere Pro articles.
How to fix Premiere Pro Unable to Render. (Accelerated Renderer Error fix)
How to fix Premiere Pro blank screen when pausing playback.
How to fix Premiere Pro MSVCP110.dll, MSVCR110.dll, MSVCR100.dll was not found.
How to fix Adobe Premiere Pro: Error compiling movie - A low-level exception occurred - ImporterMP3.