If you are using Premiere Pro and are having some problems exporting/encoding your finished projects because you keep getting the following error message There Was an error decompressing Audio or Video. This article will show you several different things you can do to solve the problem and get your projects to export.

Table of Contents
Related: How to get better gaming performance on Windows 11.
Premiere Pro is certainly one of the best video editing programs on the market and easily the most feature-rich. While it is fantastic while it is working, it’s also one of the most bug-filled and annoying tools to work with as well. If you’ve been working with Premiere Pro you know exactly what we’re talking about and you’ve probably ended up here before trying to solve one these other issues.
How to fix Premiere Pro Unable to Render. (Accelerated Renderer Error fix)
How to fix Premiere Pro blank screen when pausing playback.
How to fix Premiere Pro MSVCP110.dll, MSVCR110.dll, MSVCR100.dll was not found.
How to fix Adobe Premiere Pro: Error compiling movie - A low-level exception occurred - ImporterMP3.
The exact cause of this problem isn’t fully understood because the same audio files often work fine in other video editing software so it’s probably a case of Premiere Pro being extra fussy about something trivial. The good news is that there are a few things you can do to solve this problem and get Premiere Pro rendering/encoding content again.
How do you fix There Was an error decompressing Audio or Video in Premiere Pro?
To begin, the first thing you need to do is check/test the file you are using, so listen to or watch it in VLC or another program from start to finish without fast-forwarding. If it plays without any issues, you know the file is fine.
Try converting the file to a different format, then add it to your project.
If the file plays fine and doesn’t have any visible issues try converting it to a different format if it is an .mp3 file convert it to .wav. If the file is anything other than MP4 try converting it to MP4. MP4 is Premiere Pros preferred format so if you can, try to use that wherever possible. Once you have converted the file, open Premiere Pro again and add the new file, I generally like to rename it for good measure as well.
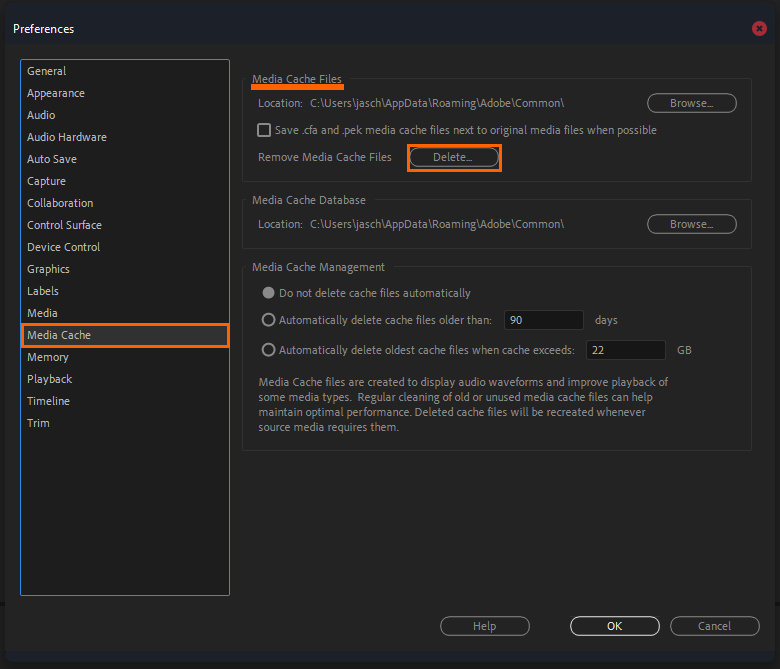
Try clearing the Premiere Pro Cache.
Another good fix for this problem is to clear the Premiere Pro cache. This will remove any old junk files and potentially corrupted data. To clear the Premiere Pro cache do the following.
- First, open Adobe Premiere Pro.
- Then click Edit >Preferences > Media Cache.
- Here click Delete under the Media Cache Files section.
- Now accept clearing everything and restart your computer and you shouldn’t have any issues with exporting/encoding anymore.
Make sure that you have enough space on your drive.
Another important thing you need to make sure you have is plenty of free space. Premiere Pro has a tendency to get unstable when there isn’t at least 15GB of free space left on the drive that it is installed on.
Uninstall and reinstall Premiere Pro.
Yep, the worst option of all but you will need to uninstall and reinstall Premiere Pro to make this problem go away. Just make sure that you keep a copy of all of your project files otherwise you’re going to be starting everything from scratch again.