Table of Contents
If you have an NVIDIA GPU installed in your computer, either a laptop or desktop PC, there’s a good chance you’ve seen the NVIDIA Control Panel icon in the context menu and System Tray. Thankfully, if you don’t like it, it can be removed quickly and easily, so follow along as we guide you through the process.
How to remove ‘Move to OneDrive’ From the context menu (right-click menu) on Windows 10.
Windows 10 is quite a customisable operating system even though it doesn’t always feel like it has your best interests at heart. Although most of the really cool stuff requires some serious work to get done, there are quite a few little tweaks and changes you can make that don’t require huge amounts of work. One such thing is context menus ‘aka’ right-click menus.
Just about every right-click (context menu) on Windows 10 can be customised and tailored to your exact needs, either adding content, or removing it entirely. Personally I’ve found remove certain entries to be very beneficial as I use to occasionally click on the entry… Causing a fair few issues I didn’t intend to have.
Other context menu customization articles.
If you are looking to make some more context menu changes, make sure you check out some of the other guides listed below.
How to Add Control Panel to the Windows 10 Context Menu.
How to Remove ‘Share’ From the Windows 10 Context Menu.
How to Disable the Start Menu Context Menu on Windows 10.
How to Customize the ‘Send to’ Context Menu on Windows 10.
How to Restore Command Prompt to the Windows 10 Context Menu.
How to Remove ‘Give Access to’ From the Windows 10 Context Menu.
Related: How to blur messages in WhatsApp until you hover over them. (on-screen privacy for WhatsApp)
How do you remove the NVIDIA Control Panel icon from the right-click menu on Windows 10?
Thankfully, most programs and apps designed for Windows 10 these days have quick and easy options within their settings that allow you to customise their quick access points. Start menu entries, system tray entries, desktop icons and just as importantly context menu entries.
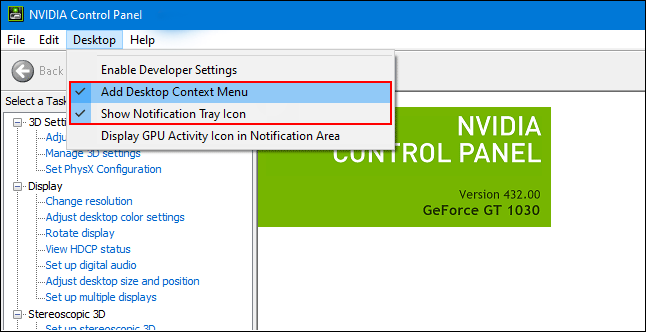
Seeing as it has been around for a long time NVIDIA Control Panel has also adopted the option, though a lot of people miss it because it is hiding in plain sight… To find the option to remove the NVIDIA Control Panel entry from the context menu on Windows 10, you first need to open the NVIDIA Control Panel. Once you have done this, click Desktop from the ribbon menu at the top of the NVIDIA Control Panel window, then click Add Desktop Context Menu and repeat the process for Show Notification Tray Icon. When the tick next to each entry has been removed the item will be removed from the location. If the tick is present, the entry will be too.
On a side note…
Another handy guide you’ll probably find quite interesting is our guide on disabling Cortana’s auto-start ability on Windows 10. This guide applies solely to the version of Cortana that is downloaded from the Microsoft Store, and will not remove the standard version of Cortana from your system.
How to Stop Cortana Auto-Starting on Windows 10. Disable Cortana Auto-Start on Windows 10.